One of the most common questions I get asked by customers is about the GE WR30X10097 ice maker found in GE french door refrigerators. This ice maker will commonly start to make a clicking noise when it fails, and it won’t produce ice properly or won’t make any ice at all. When something fails on this ice maker, the whole ice maker must be replaced as an assembly; there are no replacement parts sold separately for these ice makers.
How To Replace The Ice Maker
What’s the difference between the Samsung DA97-05422A (Aka IMC701) & GE WR30X10097?
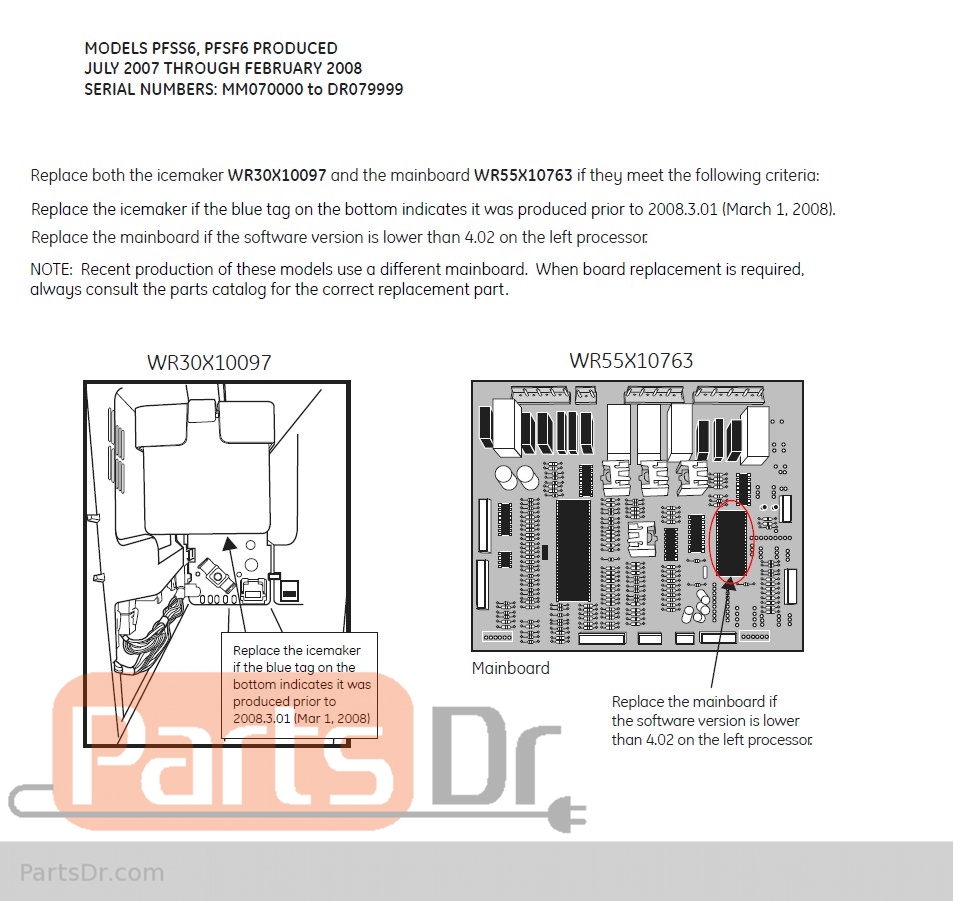
GE Service Bulletin (Model made before 3/1/2008)
I Replaced My Ice Maker And It Still Doesn’t Work
Where Can I Buy A Replacement Ice Maker?
Have More Questions?
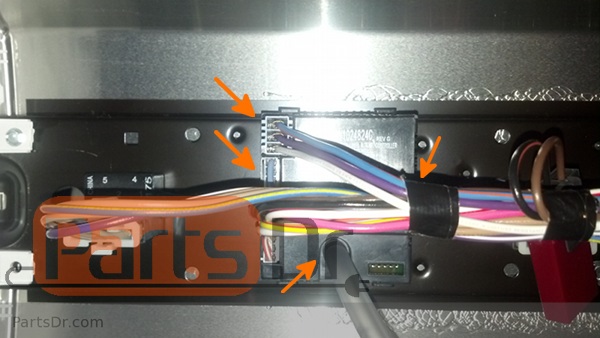
How To Replace The WR30X10097 Ice Maker
First unplug your refrigerator, and remove the ice bin container. Remove the Phillips screw on the left side, this will allow you to remove the plastic panel that covers the wiring harness going to the ice maker. Unplug the wire connector going to the ice maker, and then push down on the locking tab on the top of the ice maker while pulling it towards you to remove it. The ice maker should now be free, and you can re-install the new ice maker in the reverse order.

What’s the difference between the Samsung DA97-05422A (Aka IMC701) & GE WR30X10097 Ice Makers?
If you have already removed your old ice maker, you may have noticed that on the bottom of the ice maker there is a sticker that says Samsung on the bottom of it. Even though the refrigerator is a GE refrigerator, the ice maker was built by Samsung for GE (along with some other components on the refrigerator). The sticker usually says “Model: IMC701”, lists the manufacture date, and lists the DA97-05422A part number in the bottom right corner. You can buy the replacement ice maker from GE, the part number for the replacement ice maker sold by GE is WR30X10097. You can save yourself a lot of money if you buy the same ice maker sold by Samsung. The DA97-05422A is the Samsung part number for the same ice maker.

GE Service Bulletin (Model made before 3/1/2008)
Some GE refrigerator models manufactured before March of 2008 require the ice maker and the main control board to be replaced to prevent further issues. The control board (part number WR55X10763) is replaced with a version that includes a newer software version. These ice makers can have symptoms of ice jamming between the ice maker and the liner, clicking & grinding noises, and low or no ice production. This service bulletin only affects certain model and serial number refrigerators, please make sure yours is part of this service bulletin before ordering the control board.
To access the main control board, you will need to unplug the refrigerator and pull out the refrigerator so you have access to the back side. Remove the screws to the control board cover, and you will have access to look at the tag on the control board to see what software version you have. The control board will need to be replaced if the software version is lower than 4.02. See the service sheet below for more information.
Models Affected: PFSS6 & PFSF6
Manufacture Date: July 2007 – Feb 2008
Serial Numbers: MM070000 – DR079999
I Replaced My Ice Maker And It Still Doesn’t Work
There are multiple things that can cause your ice maker not to work. First check to see if you have water flowing to the refrigerator. Check in your owners manual & installation instructions that came with the refrigerator, it should state how much water pressure should be at the refrigerator. Low water pressure can make small ice cubes which can cause ice maker failures. If you have a water filter system in your house, then make sure you bypass the water filter inside the refrigerator. Doubling up on filters only lowers the water pressure further. If you haven’t replaced your water filter in the last 6-12 months, then replacing the water filter can help improve water flow. Most GE refrigerator models use the MWF water filter. The other components that work with the ice maker to make ice are the water inlet valve, and the main control board on the refrigerator. The temperature in the ice maker compartment must be less than 10°F to work properly. To check the temperature you should put an accurate thermometer in the ice bin for a few hours to see if it is cooling down to the proper temperature.
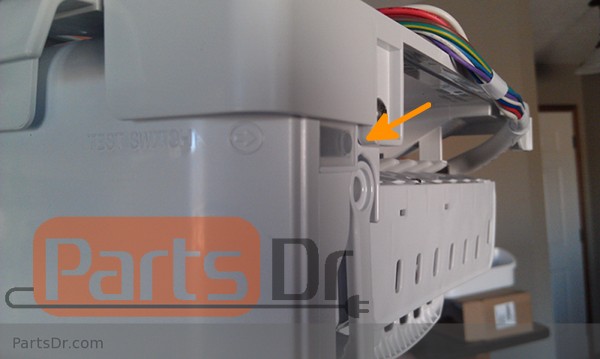
On the side of the ice maker is a test switch. Firmly press this button for a few seconds and the ice maker should go through a harvest cycle by dumping out the ice in the ice maker and filling up with water again.
Where Can I Buy A Replacement Ice Maker?
You can buy a replacement ice maker from our website, please click the link below. Parts Dr always has the lowest prices for new O.E.M. replacement parts.
Samsung Ice Maker – DA97-05422A (IMC701)

Questions or Comments?
Have Any Questions? Please post them in the comments section below and one of our experts will answer your question as soon as possible.