Shipping Options

View more details in our Shipping Policy

All shipping rate advertisements assume delivery to continental US address, and that the part is in stock and is not oversized.

Shipping rates are per order, not per part!

Standard – $10.99
Estimated arrival
Monday Apr 29–May 2
Quicker – $24.99
Estimated arrival
Monday Apr 29
Quickest – $33.99
Estimated arrival
Friday Apr 26

Tag Archives: Samsung

How to Fix a Samsung Washer 4E or 4C Error Code

Introduction:

Is your Samsung washer not filling with water and flashing the dreaded 4E or 4C error code on its display? Don’t worry; this is a common issue with Samsung washing machines and can often be resolved without the need for a technician. In this guide, we’ll walk you through the steps to diagnose and fix the 4E or 4C error code and ensure your washer gets back to working smoothly.

Understanding the 4E or 4C Error Code:

Before we dive into the solutions, let’s understand what the 4E or 4C error code means. In Samsung washers, these codes typically indicate that the washing machine has detected a problem with the water supply. This can be caused by a variety of factors, but a common culprit is a malfunctioning water inlet valve.

Diagnosing the Problem:

To troubleshoot the issue, follow these steps:

  1. Check Water Supply: Ensure that the water supply to your washer is turned on and that there are no kinks in the hoses. Sometimes, a simple issue like a blocked or kinked fill hose can trigger the error code.
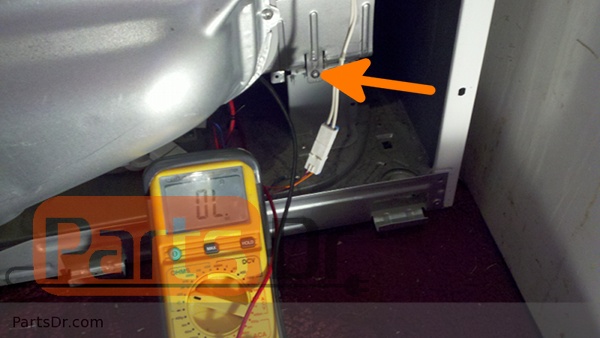
  2. Inspect Water Inlet Valve & Filter Screens: The water inlet valve is responsible for allowing water into the washer. If it’s faulty or clogged, it can trigger the error. On the back of the water inlet valve where the hoses attach to the valve are screens. These screens filter out sediment and debris that can damage the water valve. If the screens on the water valve become clogged, the water flow can slow down enough to trigger the error code. Unfortunately, these screens are not sold separately and you will have to replace the water inlet valve to resolve the issue. We have a helpful YouTube video that demonstrates how to replace the water inlet valve.

Fixing the 4E or 4C Error Code:

If you’ve ruled out issues with the water supply and determined that the water inlet valve is the likely problem, you can follow these steps to replace it:

  1. Safety First: Before starting any repair, unplug the washer from the power source and turn off the water supply.
  2. Disconnect Hoses: Disconnect the water inlet hoses from the valve. Be prepared for some water spillage, so keep a towel handy.
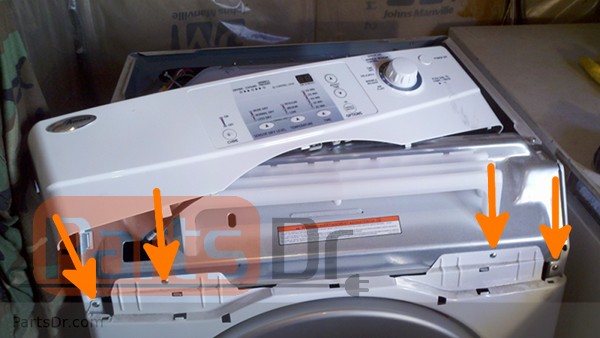
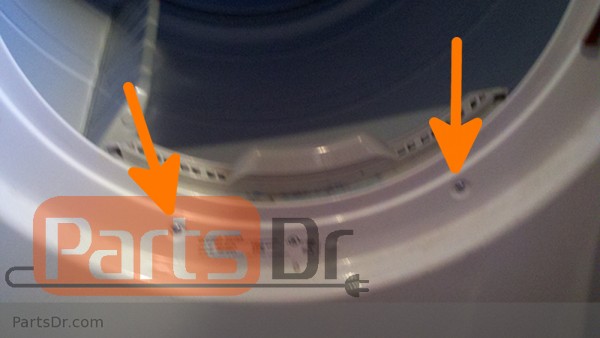
  3. Access the Valve: Depending on your washer model, you may need to remove the top or back panel to access the water inlet valve. Refer to the video here for instructions.
  4. Remove and Replace: Remove the old water inlet valve and replace it with a new one. Make sure to connect the hoses correctly.
  5. Reassemble: Put the washer back together, turn on the water supply, and plug it in.
  6. Test Run: Run a test cycle to ensure the 4E or 4C error code is gone.

Conclusion:

Don’t let the Samsung Washer 4E or 4C error code disrupt your laundry routine. By diagnosing the issue and following these steps to replace the water inlet valve, you can save time and money on service calls. If you need to purchase a replacement water inlet valve or any other parts for your Samsung washer, you can purchase them directly on our site PartsDr.com. All of the parts that we sell are Genuine OEM quality parts sourced directly from the manufacturer.

We hope this guide has helped resolve your Samsung washer error code. If you have any questions or further troubleshooting needs, feel free to ask in the comments section.

Samsung Drain Pump Relocation Kit

Posted on July 19, 2014

To improve quality Samsung has relocated the drain pump assembly from the bottom of the tub to the base of the washer on certain model numbers and production dates.  Previously these washers used part number DC97-16985A for the drain pump but this pump has been discontinued and replaced with one of the two service kits part # DC98-01877A or DC98-01877B depending on the model number and manufacture date of the washer.  First locate your model and serial number tag on the washing machine.  This tag is located on the top back console of the washer, and it will list the model number, serial number, and manufacture date. The manufacture date is listed in the format of YYYY.MM (ex: 2012.06).  Below is an example model and serial number tag to show where the manufacture date is located.

tag

If the washer was manufactured before 12/9/2012 and you have one of the qualifying models, then you will need to order the corresponding drain pump kit listed in the chart below.  Washers manufactured 12/10/2012 and later use part number PD00030925 for the drain pump and do not require the drain pump relocation kit.  Please not that the manufacture date is listed in the format of YYYY.MM (ex: 2012.06) on the tag of the washer and it will not show the day it was manufactured.  If the washer was manufactured in the month of December of 2012 you will need to check the washer to see if the pump is located on the bottom of the tub.  If the pump is located on the bottom of the tub you will need to order a drain pump relocation kit.  For installation instructions, please see the bottom of this post.

Model Code Manufacture Date BOM Version Use Part #
WA400PJHDWR/AA 12/9/2012 or Earlier 000  PD00004957
WA422PRHDWR/AA 12/9/2012 or Earlier 000  PD00004957
WA456DRHDSU/AA 12/9/2012 or Earlier 000 PD00004977
WA456DRHDWR/AA 12/9/2012 or Earlier 000 PD00004977

When the drain pump fails it can cause water to leak from the pump or it can cause the water not to drain out of the washing machine.

If you need to order one of the drain pump kits, you can click one of the links in the the above chart, or one of the links below. Parts Dr always has the lowest prices on OEM appliances parts.

Drain Pump Kit – PD00004957 (MFG# DC98-01877B)

Models WA400PJHDWR/AA & WA422PRHDWR/AA manufactured before 12/9/2012.

Drain Pump Kit –  PD00004977 (MFG# DC98-01877A)

Models WA456DRHDSU/AA & WA456DRHDWR/AA manufactured before 12/9/2012.

The photo below shows the location of the old pump and the location of where the new pump is relocated to.
newvsoldpumplocations
Before working on your appliance, make sure that it is unplugged.  Below are step by step instructions on how to install the new drain pump kit.

Pump Instructions 1

Pump Instructions 2

How To Install Samsung Dryer Heating Element DC97-14486A

Samsung dryer heating element DC97-14486A is used on many Samsung clothes dryers and even some Maytag (Neptune) and Amana dryer models.  When the heating element goes bad, it will usually have a break in the heating coil which will cause the element not to heat.  These instructions work for most Samsung dryers, some may have some small differences but the overall process if very similar.  Here is how to replace and test the DC97-14486A & DC47-00019A heating element:

First, unplug or shut off the power to the dryer before working on it.

How_to_remove_samsung_dryer_heating_element_DC47-00019A

Then remove the two screws securing the top panel to the back of the dryer.  Slide the top panel towards the back of the dryer to remove.  Now you will need to remove the front control panel, some model will have screws securing this. Remove them and then pull up to remove, you should have enough extra wire to set the control panel on top of the dryer to get it out of the way (if not, then disconnect the wires and set it off to the side).

Behind where the control panel was there will be four screws that secure the front panel of the dryer to the frame.  Remove these four screws.

How_to_remove_samsung_dryer_heating_element_DC47-00019A_2

Open the door of the dryer, there will be two screws that need to be removed at the bottom of the door frame area.  With those two screws removed you should be able to tilt the front panel forward, remove the connector to the door switch, and remove the front panel.

How_to_remove_samsung_dryer_heating_element_DC47-00019A_3

The heating element is located on the bottom right side of the dryer.  To remove the element you will need to remove the wires to the heating element, thermal fuse, and thermostat.  Then remove the mounting screw in the front and the whole heating element assembly should pull out the front of the dryer.

How_to_remove_samsung_dryer_heating_element_DC47-00019A_4

To test the heating element, you will need an Ohm meter or multi-meter.  A good heating element should read approximately 9-10 ohms.  A burned out element will have an infinite resistance (it won’t register anything).  See the video below for instructions on how to test the heating element.

To re-install the heating element you will need to put everything back in the reverse order.  If you lost track of how the wires connect to the heating element, please see the picture below.

DC97-14486A Wiring WM

If you need to purchase a new Samsung dryer heating element, click one of the two links below.

The best way to purchase the heating element is as an assembly. The heating element assembly includes the heating element, two thermostats, and housing.

Heating Element Assembly –  Part # PD00002003 (mfg # DC97-14486A)

We also sell the heating element by itself.  You will need to re-use the thermostats and element housing.

Heating Element – Part # PD00001991 (mfg # DC47-00019A)

How To Remove Samsung IMC701 DA97-05422A Ice Maker

Removing and installing a new Samsung DA97-05422A (IMC701) ice maker on a french door refrigerator is a pretty easy task.  This ice maker will often fail and make a clicking noise when it breaks.  First unplug the refrigerator.  Then remove the screw on the left, this will allow you to pull off the side panel and unplug the connector that goes to the ice maker.  Next pull the locking tab down on the ice maker while pulling the ice maker towards you.  This will release it.  Re-install the new ice maker in the reverse order.

*Note, this ice maker has the letters IMC701 written on the bottom.  Parts are not available for this ice maker separately, if something breaks, the whole ice maker must be replaced

If you have a bad ice maker and need to purchase a new one, click the link below:

DA97-05422A Ice Maker (7 Cube Ice Maker)


Samsung Blinking Dash/Line Error Code List

Posted on July 16, 2011

Samsung refrigerators will start to blink a Dash or Line on the display when they there is an error code.  For example, if #12 in the diagram below was blinking then the computer thinks that there is a problem with the condenser fan motor.  Keep in mind that error codes are a starting point, and replacing the part related to the problem does not always fix the problem.  There can be a problem with the stated part, wiring, main PCB control board, and sometimes even an un-related part.  If you are unsure you should hire a technician to properly diagnose the problem.

(Click Diagram To Enlarge)

1: Ice maker sensor -Ice Maker sensor connector missing, contact failure, electric wire cut, short-circuit, Ice Maker sensor failure, and so on.  Indicates an error when the temperature sensed by Ice Maker sensor is higher than 150℉ or lower than –58℉.

2: Refrigerator Sensor – Refrigerator sensor connector missing; contact failure, electric wire cut, short- circuit, Refrigerator sensor itself failure; and so on. Indicate Error when the temperature sensed by Refrigerator sensor is higher than 150℉or lower than –58℉.

3: Refrigerator Defrost Sensor – Refrigerator evaporator internal defrosting sensor connector missing, contact failure, electric wire cut, short-circuit, sensor itself failure; and so on.  Indicate Error when the temperature sensed by Refrigerator defrosting sensor is higher than 150℉or lower than –58℉.

4: Refrigerator Fan Error – Refrigerator Fan motor operation failure, feedback signal line contact failed, electric wire cut, short- circuit, and so on.  Indicates an error if the F and G signals generated by the FAN-motor operation are not input.

5: Ice Maker Function Error – Ice-ejector and level failed three times or more

6:  CoolSelect Zone Sensor – CoolSelect ZoneTM sensor connector missing, contact failed, electric wire cut, short-circuit, CoolSelect ZoneTM sensor itself failed, and so on. Indicates an error when the temperature sensed by CoolSelect ZoneTM sensor is higher than 150℉or lower than –58℉.

7: Refrigerator Defrost Error – In the refrigerator room, if frost removal mode is finished due to limited time of 80 minutes. Error is displayed.

8: Exit-Sensor – Air sensor connector missing; contact failure, electric wire cut, short-circuit, open air sensor itself failure, and so on.  Indicates an Error when the temperature sensed by the open air sensor is higher than 150℉or lower than –58℉.

9: Freezer Sensor – Freezer sensor connector missing, contact failed, electric wire cut, short-circuit, Freezer Room sensor itself failure.  Indicate Error when the temperature sensed by Freezer sensor is higher than 150℉ or lower than –58℉.

10: Freezer Defrost Error – Freezer evaporator defrosting sensor connector missing, contact failed, electric wire cut, short- circuit, sensor itself failure, and so on.  Indicates an error when the temperature sensed by Freezer defrosting sensor is higher than 150℉or lower than –58℉.

11: Freezer Fan Error – Freezer Fan motor operation failure, feedback signal line contact failure, motor’s electric wire missing, and so on.  Indicate Error if the F and G signals generated by the FAN-motor operation are not input.

12: Condensor Fan Error  – Condenser Fan motor operation failure, feedback signal line contact failure, motor’s electric wire missing, and so on.  Indicates an error if the F and G signals generated by the FAN- motor operation are not input.

13: Freezer Defrost Error – In the freezer room, if frost removal mode is finished due to limited time of 70 minutes. Error is displayed.

Parts Dr

Our customers matter a lot to us! So we provide YOU with as much information on repairing your appliance as possible. And its all FREE!

Categories

Locate Model Number

Choose your appliance type