Shipping Options

View more details in our Shipping Policy

All shipping rate advertisements assume delivery to continental US address, and that the part is in stock and is not oversized.

Shipping rates are per order, not per part!

Standard – $10.99
Estimated arrival
Wednesday May 1–May 6
Quicker – $24.99
Estimated arrival
Wednesday May 1
Quickest – $33.99
Estimated arrival
Tuesday Apr 30

Monthly Archives: February 2024

Fixing F4 E3 Dryer Error Code

Have the F4 E3 Error? Let’s get it fixed.

Introduction:

Is your dryer displaying the F4 E3 error code, leaving you puzzled and disrupting your laundry routine? No need to panic – this common issue with dryers can often be addressed without the need for professional assistance. In this guide, we will walk you through the steps to diagnose and fix the F4 E3 error code, ensuring your dryer gets back to optimal performance.

Understanding the F4 E3 Error Code:

Before we jump into solutions, it’s crucial to understand the meaning behind the F4 E3 error code. In most dryers made by Whirlpool, including Maytag, Amana, Kenmore and more, this code typically points to an airflow restriction issue. This restriction can lead to overheating and potential damage to your dryer.

Diagnosing the Problem:

To troubleshoot the F4 E3 error code, follow these systematic steps:

  1. Check Home Exhaust Vent: Ensure your home’s ventilation system is free from obstructions. Lint buildup, debris, or even bird nests in the vent can cause airflow restrictions.
  2. Inspect Vent Hose: Examine the vent hose that connects the dryer’s exhaust vent to the home for any kinks or blockages. A smooth, unrestricted path is crucial for proper airflow.
  3. Clean Lint Filter: Regularly clean the lint filter, as a clogged filter can impede airflow and trigger the error code.

Fixing the F4 E3 Error Code:

Once you’ve identified the airflow restriction as the likely issue, follow these steps to resolve the F4 E3 error code:

  1. Safety First: Unplug the dryer from the power source to ensure safety during the repair process.
  2. Vent Cleaning: Thoroughly clean the entire ventilation system, from the lint filter to the exterior vent. Use a vent cleaning kit or a vacuum with an extended attachment. If you have a long or hard to clean vent, look into hiring a professional to clean it.
  3. Inspect Vent Hose: Check the vent hose that goes between the dryer and the house exhaust vent for any damage or blockages. Replace if necessary.
  4. Lint Filter Replacement: If the lint filter is damaged or excessively clogged, consider replacing it with a new one.
  5. Reassemble and Test: Once the cleaning and replacements are complete, reassemble the dryer, plug it in, and run a test cycle to ensure the F4 E3 error code is resolved.
  6. Dryer not Working: If your dryer no longer works or starts, you may need to replace the thermal fuse, as it may have blown when the dryer was too hot trying to move air through the constricted airways. You can learn how to test your dryer’s thermal fuse here. To find and purchase the correct thermal fuse for your model, use the search box at the top of this page and enter your dryer’s model number to find the correct thermal fuse.

Conclusion:

Don’t let the F4 E3 dryer error code disrupt your laundry routine. By diagnosing the issue and following these steps to address airflow restrictions, you can save time and money on service calls.

We hope this guide has helped you tackle the F4 E3 error code in your dryer. If you have any questions or need further clarification, feel free to ask in the comments section. Don’t forget to search our site for all of your appliance parts that may be needed! Happy drying!

GE Dishwasher not drying Dishes – No Error Code

There are no error codes thrown. Your dishwasher runs fine, through an entire cycle, but when you open the completed load of dishes, you find that the dishes that you just got done cleaning are completely soaked. Water is sitting on top of the glasses and in all of the areas that will hold water in your dishwasher load. You might immediately think, “The heating element has gone bad!” or “I need a new control board.” You may have a bad heating element or you may have a bad control board. However, the heating element or control board is rarely the issue for these symptoms.

There may be a simple answer to your non-drying GE dishwasher.

Your Float Switch Assembly may have failed.

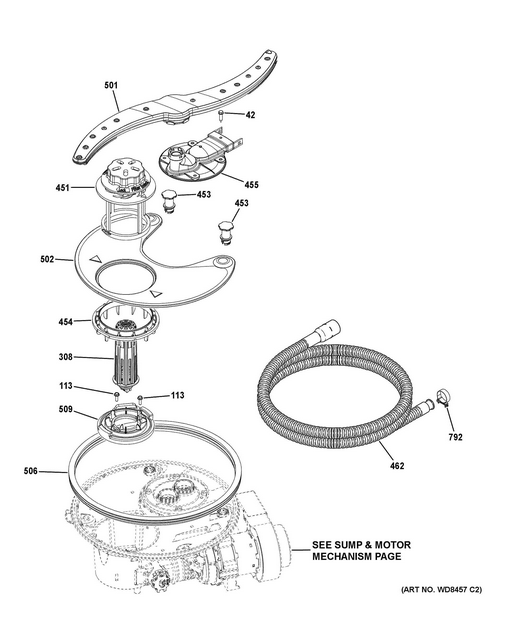
First, search using your dishwasher’s model number at our website and pull up the parts list to see if your model has a float switch similar to the one in the above photo. If it does, you can order that after confirming fitment. Once you have received the part, the repair is fairly simple!

Overview of how to replace the float switch

Step 1: You’ll want to pull your Filter (#451 in the diagram) from the bottom of the dishwasher to expose the Float switch assembly #308. There is a screw off ring (#454) that you can unscrew to best access the float switch. Once you have these removed, you can find the two screws that hold the float switch in place.

Note: You may need to dry the area around the float switch assembly as there may be standing water. If you remove your float switch and there is standing water it will leak out of the bottom of the dishwasher. You can use a wet/dry vacuum to remove the standing water.

Step 2: Remove the two 1/4″ screws holding the float switch down (This may be a different size on different models). Be careful not to lose the screws into the drain area holes next to the float switch assembly.

Step 3: Once the screws are removed, pull the Float Switch out of the hole. It is attached through the bottom to a wire harness plug. You can remove the electrical plug from the back of the float switch and plug your new float switch in.

Step 4: Place the float switch back in the hole and reinstall the two screws, hand tightening them. Reinstall the upper adapter #454 and the filter #451.

You should now have a dishwasher that completes a cycle and produces dry dishes for you to put away!

Where to Purchase

You can place your order for this float switch on our website (Parts Dr.) when ready! Please make sure to use our model number fitment checker prior to purchase!

Ohm’s Law Calculator: A Crucial Tool for Appliance Repair

Ohm’s Law Calculator: A Crucial Tool for Appliance Repair

Ohm’s Law Calculator


Using the Ohm’s Law Calculator

To use the Ohm’s Law Calculator, follow these simple steps:

  1. Enter known values into any two input fields (Voltage, Current, Resistance, or Power).
  2. Optionally, you can select different units from the dropdown menus for each input field.
  3. Click the “Calculate” button to compute the remaining values.
  4. The calculator will automatically calculate and display the missing values based on Ohm’s Law.

For example, if you know the Voltage (V) and Current (I) in a circuit, enter those values into their respective fields, then click “Calculate” to find the Resistance (R) and Power (P). Similarly, you can enter any other combination of two known values to find the remaining two values.

Understanding Ohm’s Law: A Crucial Tool for DIY Appliance Repair

When it comes to DIY appliance repair, having a solid understanding of the fundamentals of electricity is essential. Among these fundamentals, one principle stands out as particularly crucial: Ohm’s Law. Named after the German physicist Georg Simon Ohm, this law forms the backbone of electrical engineering and is indispensable for troubleshooting and repairing a wide range of household appliances, including ranges, ovens, dishwashers, refrigerators, microwaves, washers, and dryers.

What is Ohm’s Law?

At its core, Ohm’s Law describes the relationship between voltage (V), current (I), and resistance (R) in an electrical circuit. It is often summarized by the formula:

V = I × R

Where:

  • V represents voltage, measured in volts (V).
  • I represents current, measured in amperes (A).
  • R represents resistance, measured in ohms (Ω).

In simpler terms, Ohm’s Law tells us that the voltage across a resistor in an electrical circuit is directly proportional to the current flowing through it, and inversely proportional to the resistance of the resistor.

Application in DIY Appliance Repair

Understanding Ohm’s Law can be incredibly beneficial when troubleshooting and repairing household appliances. Here’s how it applies to various scenarios:

  • Heating Elements in Ranges and Ovens: Heating elements in electric ranges and ovens are essentially resistors that generate heat when current flows through them. By applying Ohm’s Law, you can measure the resistance of a heating element (with the power disconnected) and determine if it is faulty. A significant deviation from the expected resistance indicates a problem with the heating element.
  • Motor Troubleshooting in Dishwashers, Washers, and Dryers: Motors in appliances like dishwashers, washers, and dryers rely on the relationship between voltage, current, and resistance. By measuring these parameters, you can diagnose motor issues such as worn-out brushes, damaged windings, or faulty connections.
  • Compressor Diagnosis in Refrigerators: Refrigerators use compressors to maintain the desired temperature. Ohm’s Law can help diagnose compressor problems by assessing the resistance of the compressor windings. A deviation from the expected resistance values could indicate a compressor issue requiring repair or replacement.
  • Microwave Magnetron Testing: The magnetron in a microwave oven is responsible for generating microwave radiation. Testing the magnetron’s resistance can help determine its health. Ohm’s Law assists in analyzing the relationship between voltage, current, and resistance to identify potential faults.
  • Electrical Safety: Beyond troubleshooting, understanding Ohm’s Law is crucial for ensuring safety during appliance repair. By calculating the expected voltage, current, or resistance in a circuit, you can anticipate potential hazards and take appropriate precautions, such as wearing insulated gloves and disconnecting power sources.

Conclusion

In the realm of appliance repair, Ohm’s Law serves as a powerful tool for diagnosing problems and identifying faulty components. By mastering this fundamental principle, you equip yourself with the knowledge and skills needed to tackle a wide range of appliance issues confidently. Whether you’re dealing with a malfunctioning range, a washer that won’t run, or a refrigerator that won’t cool, Ohm’s Law provides a reliable framework for effective troubleshooting and repair.

Armed with the understanding of Ohm’s Law, both professionals and DIY enthusiasts can embark on appliance repair projects with greater confidence, efficiency, and safety.

Parts Dr

Our customers matter a lot to us! So we provide YOU with as much information on repairing your appliance as possible. And its all FREE!

Categories

Locate Model Number

Choose your appliance type