Shipping Options

View more details in our Shipping Policy

All shipping rate advertisements assume delivery to continental US address, and that the part is in stock and is not oversized.

Shipping rates are per order, not per part!

Standard – $10.99
Estimated arrival
Thursday Mar 21–26
Quicker – $24.99
Estimated arrival
Thursday Mar 21
Quickest – $33.99
Estimated arrival
Wednesday Mar 20

Appliance Repair Blog

Fixing F4 E3 Dryer Error Code

Have the F4 E3 Error? Let’s get it fixed.

Introduction:

Is your dryer displaying the F4 E3 error code, leaving you puzzled and disrupting your laundry routine? No need to panic – this common issue with dryers can often be addressed without the need for professional assistance. In this guide, we will walk you through the steps to diagnose and fix the F4 E3 error code, ensuring your dryer gets back to optimal performance.

Understanding the F4 E3 Error Code:

Before we jump into solutions, it’s crucial to understand the meaning behind the F4 E3 error code. In most dryers made by Whirlpool, including Maytag, Amana, Kenmore and more, this code typically points to an airflow restriction issue. This restriction can lead to overheating and potential damage to your dryer.

Diagnosing the Problem:

To troubleshoot the F4 E3 error code, follow these systematic steps:

  1. Check Home Exhaust Vent: Ensure your home’s ventilation system is free from obstructions. Lint buildup, debris, or even bird nests in the vent can cause airflow restrictions.
  2. Inspect Vent Hose: Examine the vent hose that connects the dryer’s exhaust vent to the home for any kinks or blockages. A smooth, unrestricted path is crucial for proper airflow.
  3. Clean Lint Filter: Regularly clean the lint filter, as a clogged filter can impede airflow and trigger the error code.

Fixing the F4 E3 Error Code:

Once you’ve identified the airflow restriction as the likely issue, follow these steps to resolve the F4 E3 error code:

  1. Safety First: Unplug the dryer from the power source to ensure safety during the repair process.
  2. Vent Cleaning: Thoroughly clean the entire ventilation system, from the lint filter to the exterior vent. Use a vent cleaning kit or a vacuum with an extended attachment. If you have a long or hard to clean vent, look into hiring a professional to clean it.
  3. Inspect Vent Hose: Check the vent hose that goes between the dryer and the house exhaust vent for any damage or blockages. Replace if necessary.
  4. Lint Filter Replacement: If the lint filter is damaged or excessively clogged, consider replacing it with a new one.
  5. Reassemble and Test: Once the cleaning and replacements are complete, reassemble the dryer, plug it in, and run a test cycle to ensure the F4 E3 error code is resolved.
  6. Dryer not Working: If your dryer no longer works or starts, you may need to replace the thermal fuse, as it may have blown when the dryer was too hot trying to move air through the constricted airways. You can learn how to test your dryer’s thermal fuse here. To find and purchase the correct thermal fuse for your model, use the search box at the top of this page and enter your dryer’s model number to find the correct thermal fuse.

Conclusion:

Don’t let the F4 E3 dryer error code disrupt your laundry routine. By diagnosing the issue and following these steps to address airflow restrictions, you can save time and money on service calls.

We hope this guide has helped you tackle the F4 E3 error code in your dryer. If you have any questions or need further clarification, feel free to ask in the comments section. Don’t forget to search our site for all of your appliance parts that may be needed! Happy drying!

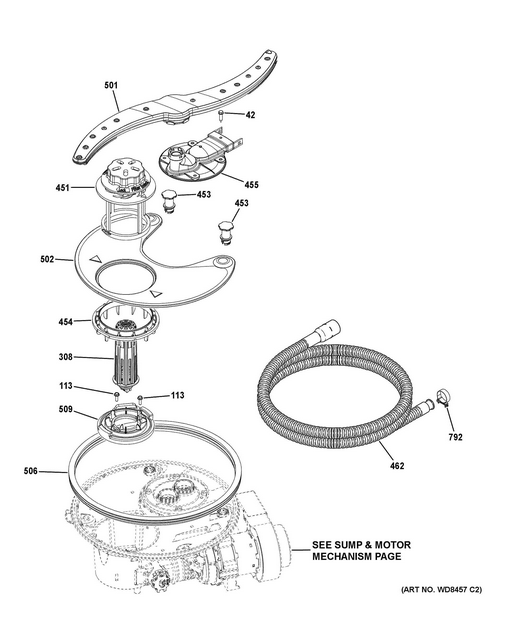
GE Dishwasher not drying Dishes – No Error Code

There are no error codes thrown. Your dishwasher runs fine, through an entire cycle, but when you open the completed load of dishes, you find that the dishes that you just got done cleaning are completely soaked. Water is sitting on top of the glasses and in all of the areas that will hold water in your dishwasher load. You might immediately think, “The heating element has gone bad!” or “I need a new control board.” You may have a bad heating element or you may have a bad control board. However, the heating element or control board is rarely the issue for these symptoms.

There may be a simple answer to your non-drying GE dishwasher.

Your Float Switch Assembly may have failed.

First, search using your dishwasher’s model number at our website and pull up the parts list to see if your model has a float switch similar to the one in the above photo. If it does, you can order that after confirming fitment. Once you have received the part, the repair is fairly simple!

Overview of how to replace the float switch

Step 1: You’ll want to pull your Filter (#451 in the diagram) from the bottom of the dishwasher to expose the Float switch assembly #308. There is a screw off ring (#454) that you can unscrew to best access the float switch. Once you have these removed, you can find the two screws that hold the float switch in place.

Note: You may need to dry the area around the float switch assembly as there may be standing water. If you remove your float switch and there is standing water it will leak out of the bottom of the dishwasher. You can use a wet/dry vacuum to remove the standing water.

Step 2: Remove the two 1/4″ screws holding the float switch down (This may be a different size on different models). Be careful not to lose the screws into the drain area holes next to the float switch assembly.

Step 3: Once the screws are removed, pull the Float Switch out of the hole. It is attached through the bottom to a wire harness plug. You can remove the electrical plug from the back of the float switch and plug your new float switch in.

Step 4: Place the float switch back in the hole and reinstall the two screws, hand tightening them. Reinstall the upper adapter #454 and the filter #451.

You should now have a dishwasher that completes a cycle and produces dry dishes for you to put away!

Where to Purchase

You can place your order for this float switch on our website (Parts Dr.) when ready! Please make sure to use our model number fitment checker prior to purchase!

Ohm’s Law Calculator: A Crucial Tool for Appliance Repair

Ohm’s Law Calculator: A Crucial Tool for Appliance Repair

Ohm’s Law Calculator


Using the Ohm’s Law Calculator

To use the Ohm’s Law Calculator, follow these simple steps:

  1. Enter known values into any two input fields (Voltage, Current, Resistance, or Power).
  2. Optionally, you can select different units from the dropdown menus for each input field.
  3. Click the “Calculate” button to compute the remaining values.
  4. The calculator will automatically calculate and display the missing values based on Ohm’s Law.

For example, if you know the Voltage (V) and Current (I) in a circuit, enter those values into their respective fields, then click “Calculate” to find the Resistance (R) and Power (P). Similarly, you can enter any other combination of two known values to find the remaining two values.

Understanding Ohm’s Law: A Crucial Tool for DIY Appliance Repair

When it comes to DIY appliance repair, having a solid understanding of the fundamentals of electricity is essential. Among these fundamentals, one principle stands out as particularly crucial: Ohm’s Law. Named after the German physicist Georg Simon Ohm, this law forms the backbone of electrical engineering and is indispensable for troubleshooting and repairing a wide range of household appliances, including ranges, ovens, dishwashers, refrigerators, microwaves, washers, and dryers.

What is Ohm’s Law?

At its core, Ohm’s Law describes the relationship between voltage (V), current (I), and resistance (R) in an electrical circuit. It is often summarized by the formula:

V = I × R

Where:

  • V represents voltage, measured in volts (V).
  • I represents current, measured in amperes (A).
  • R represents resistance, measured in ohms (Ω).

In simpler terms, Ohm’s Law tells us that the voltage across a resistor in an electrical circuit is directly proportional to the current flowing through it, and inversely proportional to the resistance of the resistor.

Application in DIY Appliance Repair

Understanding Ohm’s Law can be incredibly beneficial when troubleshooting and repairing household appliances. Here’s how it applies to various scenarios:

  • Heating Elements in Ranges and Ovens: Heating elements in electric ranges and ovens are essentially resistors that generate heat when current flows through them. By applying Ohm’s Law, you can measure the resistance of a heating element (with the power disconnected) and determine if it is faulty. A significant deviation from the expected resistance indicates a problem with the heating element.
  • Motor Troubleshooting in Dishwashers, Washers, and Dryers: Motors in appliances like dishwashers, washers, and dryers rely on the relationship between voltage, current, and resistance. By measuring these parameters, you can diagnose motor issues such as worn-out brushes, damaged windings, or faulty connections.
  • Compressor Diagnosis in Refrigerators: Refrigerators use compressors to maintain the desired temperature. Ohm’s Law can help diagnose compressor problems by assessing the resistance of the compressor windings. A deviation from the expected resistance values could indicate a compressor issue requiring repair or replacement.
  • Microwave Magnetron Testing: The magnetron in a microwave oven is responsible for generating microwave radiation. Testing the magnetron’s resistance can help determine its health. Ohm’s Law assists in analyzing the relationship between voltage, current, and resistance to identify potential faults.
  • Electrical Safety: Beyond troubleshooting, understanding Ohm’s Law is crucial for ensuring safety during appliance repair. By calculating the expected voltage, current, or resistance in a circuit, you can anticipate potential hazards and take appropriate precautions, such as wearing insulated gloves and disconnecting power sources.

Conclusion

In the realm of appliance repair, Ohm’s Law serves as a powerful tool for diagnosing problems and identifying faulty components. By mastering this fundamental principle, you equip yourself with the knowledge and skills needed to tackle a wide range of appliance issues confidently. Whether you’re dealing with a malfunctioning range, a washer that won’t run, or a refrigerator that won’t cool, Ohm’s Law provides a reliable framework for effective troubleshooting and repair.

Armed with the understanding of Ohm’s Law, both professionals and DIY enthusiasts can embark on appliance repair projects with greater confidence, efficiency, and safety.

How to Use the Serial Number on Your GE Appliance to Determine Its Age

If you’re wondering how old your GE appliance is, you can determine its age by using the serial number. Each GE appliance has a unique serial number that contains information about the appliance, including the month and year of manufacture.

In this post, we’ll walk you through how to decode your GE appliance’s serial number to determine its age. We’ll use the examples from Eric’s video to illustrate the process.

Step 1: Locate your appliance’s model tag

Before you can decode your appliance’s serial number, you’ll need to locate its model tag. The model tag is a small metal or plastic plate that is typically located on the appliance in a safe but easy to find location. If you’re having trouble locating the tag, you can use our model number locator for common tag locations.

Step 2: Determine the month of manufacture

The first character of the serial number indicates the month in which the appliance was manufactured. Use GE’s Appliance Manufacture Date Code Chart to determine the corresponding month. For example, if the first character of your appliance’s serial number is ‘D’, it was manufactured in February.

Step 3: Determine the year of manufacture

The second character of the serial number indicates the years during which the appliance may have been manufactured. Use GE’s Appliance Manufacture Date Code Chart to determine the possible years. For example, if the second character of your appliance’s serial number is ‘R’, it could have been manufactured in 2020, 2008, 1996, 1984, 1972, or 1958.

Step 4: Use the owner’s manual to narrow down the year

To narrow down which year your appliance was manufactured, you’ll need to reference the owner’s manual. Look for a date on the bottom of the first or last page. If you don’t have a physical copy of the manual, you can find a digital version on GE’s website using your appliance’s model number.

Match up the year from the owner’s manual to the closest year in the chart. For example, if the date listed in your owner’s manual is 11-22 and the second character of your appliance’s serial number is ‘R’, the closest year in the chart is 2020. This indicates that your appliance was manufactured in February of 2020.

Examples

Let’s run through a few examples using the information from Eric’s video.

Example 1: GE Microwave

Serial Number: D S

Month: February

Possible Years: 2021, 2009, 1997, 1985, 1973, or 1959

Date Listed in Owner’s Manual: 11-08

Closest Year in Chart: 2009

This indicates that this microwave was manufactured in February of 2009.

Example 2: GE Stove

Serial Number: H A

Month: May

Possible Years: 2013, 2001, 1989, 1977, 1944

Date Listed in Owner’s Manual: 01-09

Closest Year in Chart: 2013

This indicates that this stove was manufactured in May of 2013.

Example 3: Older GE Stove

Serial Number: A H

Month: January

Possible Years: 2017, 2005, 1993, 1981, 1951

Date Listed in Owner’s Manual: 03-93

This indicates that this stove was manufactured in January of 1993.

Conclusion

Decoding your GE appliance’s serial number is a simple process that can help you determine its age. By using GE’s Appliance Manufacture Date Code Chart and the information from your appliance’s model tag and owner’s manual, you can easily determine when your appliance was made.

Easily Disassemble Your Whirlpool Maytag KitchenAid Dishwasher: Step-by-Step Guide

Dishwashers have become an indispensable part of our modern kitchens, making daily chores more convenient and saving us precious time. However, like all appliances, they too may require maintenance or repair over time. The good news is that many issues can be fixed with a little DIY know-how and the right guidance. In this comprehensive guide, we’ll take you through the process of disassembling your dishwasher step by step, so you can troubleshoot, maintain, or repair it with confidence. And the best part? We’ve created an accompanying video tutorial to make the process even easier for you!

Why Disassemble Your Dishwasher?

You might be wondering why you’d need to disassemble your dishwasher in the first place. Well, there are several good reasons:

  1. Maintenance: Routine maintenance can prolong the life of your dishwasher and ensure it operates efficiently.
  2. Troubleshooting: If your dishwasher isn’t working properly, disassembling it allows you to identify and address issues more effectively.
  3. Repairs: In some cases, you may need to replace specific components, such as the control panel or heating element. Disassembly is the first step in making these repairs.

Step-by-Step Guide:

Our video tutorial, “Easily Disassemble Your Whirlpool Maytag KitchenAid Dishwasher: Step-by-Step Guide,” is designed to make dishwasher disassembly a breeze. It’s not just a walkthrough; it’s a hands-on journey through your dishwasher’s internal workings. To give you a taste of what’s in store, here’s a glimpse of what you’ll learn:

  • How to Remove the Dishwasher: We’ll start with the basics, showing you how to safely and easily disconnect your dishwasher from its installation.
  • Top Mounting Brackets: Learn the ins and outs of these essential brackets that secure your dishwasher in place.
  • Touchpad Control Panel: Get familiar with the control hub of your dishwasher, allowing you to troubleshoot and maintain its electronic components.
  • Main Control Board: Delve into the central command center of your dishwasher, understanding its functions and troubleshooting potential.
  • Door Latch: Discover how to access and manage this crucial component responsible for secure door closure.
  • Detergent Dispenser: Learn how to maintain and replace the dispenser responsible for delivering soap to your wash cycles.
  • Door Seals: Explore the world of seals, including the lower door seal and door gasket seal, to ensure your dishwasher doesn’t leak.
  • And More: We won’t leave you hanging—there’s a comprehensive breakdown of additional components like the upper dishrack adjuster, float switch, water inlet valve, drain pump, heating element, circulation pump motor, sump assembly, and more.

With our video tutorial and this accompanying guide, you’ll have the knowledge and confidence to tackle any dishwasher maintenance or repair project. Whether you’re a seasoned DIY enthusiast or simply aiming to save on repair costs, this resource empowers you to take control of your dishwasher’s maintenance and repair. Don’t forget to watch the video, subscribe for more appliance repair tips, and hit that notification bell to stay updated with our latest content. A well-maintained dishwasher means cleaner dishes and a happier kitchen!

How to Fix a Samsung Washer 4E or 4C Error Code

Introduction:

Is your Samsung washer not filling with water and flashing the dreaded 4E or 4C error code on its display? Don’t worry; this is a common issue with Samsung washing machines and can often be resolved without the need for a technician. In this guide, we’ll walk you through the steps to diagnose and fix the 4E or 4C error code and ensure your washer gets back to working smoothly.

Understanding the 4E or 4C Error Code:

Before we dive into the solutions, let’s understand what the 4E or 4C error code means. In Samsung washers, these codes typically indicate that the washing machine has detected a problem with the water supply. This can be caused by a variety of factors, but a common culprit is a malfunctioning water inlet valve.

Diagnosing the Problem:

To troubleshoot the issue, follow these steps:

  1. Check Water Supply: Ensure that the water supply to your washer is turned on and that there are no kinks in the hoses. Sometimes, a simple issue like a blocked or kinked fill hose can trigger the error code.
  2. Inspect Water Inlet Valve & Filter Screens: The water inlet valve is responsible for allowing water into the washer. If it’s faulty or clogged, it can trigger the error. On the back of the water inlet valve where the hoses attach to the valve are screens. These screens filter out sediment and debris that can damage the water valve. If the screens on the water valve become clogged, the water flow can slow down enough to trigger the error code. Unfortunately, these screens are not sold separately and you will have to replace the water inlet valve to resolve the issue. We have a helpful YouTube video that demonstrates how to replace the water inlet valve.

Fixing the 4E or 4C Error Code:

If you’ve ruled out issues with the water supply and determined that the water inlet valve is the likely problem, you can follow these steps to replace it:

  1. Safety First: Before starting any repair, unplug the washer from the power source and turn off the water supply.
  2. Disconnect Hoses: Disconnect the water inlet hoses from the valve. Be prepared for some water spillage, so keep a towel handy.
  3. Access the Valve: Depending on your washer model, you may need to remove the top or back panel to access the water inlet valve. Refer to the video here for instructions.
  4. Remove and Replace: Remove the old water inlet valve and replace it with a new one. Make sure to connect the hoses correctly.
  5. Reassemble: Put the washer back together, turn on the water supply, and plug it in.
  6. Test Run: Run a test cycle to ensure the 4E or 4C error code is gone.

Conclusion:

Don’t let the Samsung Washer 4E or 4C error code disrupt your laundry routine. By diagnosing the issue and following these steps to replace the water inlet valve, you can save time and money on service calls. If you need to purchase a replacement water inlet valve or any other parts for your Samsung washer, you can purchase them directly on our site PartsDr.com. All of the parts that we sell are Genuine OEM quality parts sourced directly from the manufacturer.

We hope this guide has helped resolve your Samsung washer error code. If you have any questions or further troubleshooting needs, feel free to ask in the comments section.

Stop Your Samsung Water Pitcher from Leaking with This Easy DIY Hack

Posted on March 24, 2023

If you own a Samsung Water Pitcher for your refrigerator, you may have experienced the frustration of it leaking when you try to pour water. The problem is that the factory gasket on the lid is not thick enough to create an airtight seal with the pitcher, causing water to seep through and drip from the pitcher. But don’t worry, we have a quick and easy fix for you!

To fix the leaking issue, you will need a few things: a flathead screwdriver or butter knife, a size 64, 3 1/2” x 1/4” rubber band, and of course, your Samsung Water Pitcher.

First, using a flathead screwdriver or butter knife, gently separate the gasket from the pitcher, being careful not to damage the gasket. Then, stretch the rubber band around the filter and seat it in the groove that the gasket sits in. Make sure the rubber band is lying flat and is not bound or twisted. The rubber band will make it so that the gasket seats slightly further out, allowing for a tighter fit.

Next, reinstall the gasket by aligning it so that its shape mirrors the shape of the lid. Stretch the gasket back over the lid so that it seats on top of the rubber band. Finally, fill the pitcher up, press the lid back into place, and pour to test for any leaks.

And that’s it! With this simple fix, your Samsung Water Pitcher should no longer leak. If you found this blog post helpful, make sure to check out the video above and drop a like or comment to let us know.

Whirlpool Part # W10860447 Programming Instructions

Posted on July 13, 2022

When you install a new control board Whirlpool part number W10860447 (PD00068539) the control board will require that it is programmed before it will operate. To program this control board please follow the programming instructions below.

Programming Mode:
NOTE: The Program Code is located on the Serial Plate on this unit after the word Code.
1. Press and hold the Door Alarm Keypad.
2. Press and hold Freezer Temperature DOWN /- Keypad within 3 seconds.
3. Release the Door Alarm Keypad and wait 3 seconds.
4. The control will display PE to indicate the programming mode.
5. Entry is confirmed by pressing the Freezer Temperature DOWN /- Keypad once more.
6. The control will display the current Program CODE. This value should be validated with the Program CODE printed on the unit serial plate.
NOTE: If the Program CODE is correct, the Programming Mode is exited by pressing Door Alarm Keypad for 3 seconds.
7. Press the Refrigerator Temperature UP /+ Keypad or Refrigerator Temperature DOWN /- Keypad to change the digit value with each key press.
8. The decimal point indicates the selected digit. Press the Freezer Temperature UP /+ Keypad to select the next digit.
9. Once the desired Program CODE is entered, press and hold the Freezer Temperature DOWN /- Keypad until the Program
CODE begins flashing indicating it has been saved.
NOTE: If you attempt to enter an invalid Program CODE the control will not save the new code, but will beep. (The unit will NOT run with a Program CODE of 0000). Once the Program CODE has been saved the Programming Mode is exited by pressing any key. If the new code is incorrect this process should be repeated.
The Programming mode can be exited at any time by pressing Door Alarm key for 3 seconds or will exit if unattended for four minutes.

If you need to purchase a new control board you can purchase this part from our website using the link below.
Control Board – Part Number W10860447 (PD00068539)

Labor Day Holiday Shipping Notice

In observance of the Labor Day holiday our offices with be closed Monday September 6th, and we will reopen for normal business hours on Tuesday September 7th.  Orders placed after 3:00PM CT on Friday Sept 3th will ship out Tuesday September 7th.  Shipping Carriers UPS, USPS, and Fedex will not be delivering any packages on Monday September 6th, so please plan and choose your shipping method accordingly.  Happy Labor Day from the Parts Dr team!

flags

Frigidaire/Kenmore Range F11 Error Code Beeping

Video Transcript:

Hey what’s up guys its Ryan here with Parts Dr today and were back with another video. Here I’ve got a control board that a customer sent back to me. This is an interesting one the customer was getting an F11 error code on the display on the control board. If you’re not already familiar with that error code it means that the control board is sensing a stuck or shorted key on the touch membrane. The interesting thing with this one is when I was looking over the buttons on it is that they all look very similar except for this one over here in the bottom corner. And if we zoom in on it real close here you can that it looks like there is some sort of metal or corrosion that is causing this part of the metal to touch this part of the metal, which would be shorting out this key making it think that it is being pressed all of the time. If anyone has any idea of what might be causing this please leave us a comment below letting us know. I’m not sure if it’s moisture, or if it’s a problem with someone pressing the buttons too hard that is wearing and rubbing on this. Now one thing to note is the one that we are looking at here I have the overlay already removed off the front of it. Normally when this is sitting on your stove and installed into your stove your going to see the overlay faceplate which labels all of the buttons. So you would have your numbers over here and your bake and broil, clock, time, up and down arrows things like that. We have that removed just so we can show you what it looks like underneath of that. Now if you do have an F11 error code this piece on the front here is kind of like a sticker also this switch membrane and it is something that you could remove off of here. Unfortunately, the manufacture doesn’t sell this piece separate from the control board. So if you have one of these that is bad you have to replace the whole control board as an assembly. If you need to order one of these you can check out our website partsdr.com we will leave a link in the description below. There’s quite a few of these control boards and they all look very physically similar from the outside so make sure before you order one that you go on our website and search with the model number from your range or oven to make sure that you are ordering the correct one before you place an order. If this video help you out at all please hit the thumbs up button below. And you can also subscribe to our Youtube channel for more appliance repair videos. And if this video helped you fix the problem with your range or oven please just drop us a comment in the comments section below. We love to know when we’ve helped someone out fix their appliance. Thanks have a nice day!

Parts Dr

Our customers matter a lot to us! So we provide YOU with as much information on repairing your appliance as possible. And its all FREE!

Categories

Locate Model Number

Choose your appliance type