Shipping Options

View more details in our Shipping Policy

All shipping rate advertisements assume delivery to continental US address, and that the part is in stock and is not oversized.

Shipping rates are per order, not per part!

Standard – $10.99
Estimated arrival
Tuesday Apr 23–26
Quicker – $24.99
Estimated arrival
Tuesday Apr 23
Quickest – $33.99
Estimated arrival
Monday Apr 22

Tag Archives: Kenmore

How To Remove & Install 131763202 Door Lock Latch

The Frigidaire door lock/latch 131763202 has been used on many different models of washers over the years.  Removing and installing this part is an easy that only takes a few minutes. No need to call Keys 4 The City locksmiths or a repair service, you can handle this one. These are some of the symptoms you can experience when the door latch/lock fails:  door won’t lock, door won’t unlock, E47 error code, agitates but won’t spin, and more.

Here is how to replace the door lock/latch assembly:

Always unplug your appliance before working on it.  First open the door and remove the two phillips screws.

Next remove the door boot seal clamp and peal back the door boot to give you access to the door lock.  You should be able to pull the door lock out and remove the three wire connectors that plug into the door latch.

Re-install the parts in the reverse order and test out the washer to make sure that it is operating correctly.

If you have a bad door lock/latch and need to purchase a new one, click the link below:

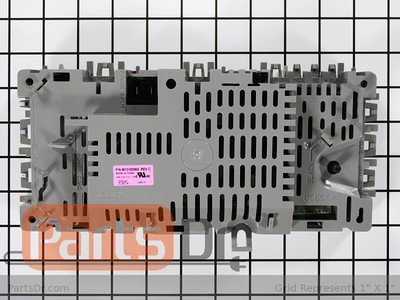
Door Lock Latch/Switch Assembly – 131763202

Frigidaire & Kenmore Garage Refrigerator Heater Kit 5303918301

Frigidaire and some Kenmore refrigerators offer a garage heater kit to keep the refrigerator operating at temperatures down to 34°F.  Without the garage heater kit, the manufacturer states that the refrigerator may not work correctly at temperatures below 55°F (13°C).  So if you plan to keep your refrigerator in a cold garage in the winter time or any other unheated area, you will want to install the garage kit that Frigidaire/Kenmore offer to keep your refrigerator working properly.  The garage heater kit is installed in the refrigerator section next to the thermostat & defrost timer.

Note: This is not designed to work with side-by-side, counter-depth refrigerators, models with electronic controls, or those made before 2001.  Only top freezer refrigerator models can use this heater designed for those put in garages or basements where the temperature drops to 34 degrees Fahrenheit.

The manufacture part number for the garage kit is 5303918301, and it can be purchased from our online store by clicking the link below:

Garage Refrigerator Heater Kit – MFG Part # 5303918301 (Part # PD00000271)

Before working on your appliance, make sure that it is unplugged.  Below are step by step instructions on how to install the garage heater kit.
5303918301_1
5303918301_2
5303918301_3
5303918301_4

How To Remove & Install Drain Pump W10536347

Removing drain pump part number W10536347 is a simple task.  When this pump fails, the washer will display “LD” on the display which means “Long Drain”.  This pump can be found on Whirlpool Cabrio, Maytag Bravos, and Kenmore Oasis model washing machines.  The pump can fail if something gets stuck in the pump (coin, clothing item, ect), and sometimes you can get lucky and just remove the object that was stuck in the pump.  Other times the pump can break, so make sure so inspect the pump before putting it back in the washer.

How to the remove the drain pump:

  1. Unplug the washer
  2. Next, you will need to remove any water still in the washer (use a wetvac, bucket, towels, ect to do this)
  3. Turn off the water supply going to the washer & disconnect the hot & cold fill hoses to the washer
  4. Remove the drain hose from the wall or drain tub
  5. Tape the lid shut (so the lid doesn’t pop open)
  6. Carefully lay the washer down on its front side (place some towels or rugs on the floor to protect the washer).
  7. Note:  On the bottom side of the washer, the drain pump is the larger of the two pumps (the recirculation pump is the smaller one).
  8. Remove the drain hose (discharge hose) from the pump.  Loose then clamp and pull off the hose.  Note there is a notch in the hose to line up when you put the hose back on.
  9. Remove the inlet hose to the pump.  Loosen the clamp and remove the hose from the pump.
  10. Open the end cover on the pump and remove the wire connector.
  11. Remove the three 5/16″ screws securing the pump.
  12. The pump should now be free.  Check to see if anything is caught in the impeller.  If you notice any damage, or the pump still does not work then you will need to replace the drain pump assembly.
  13. Re-install in the reverse order.  NOTE:  The new pump includes a shield cover that goes between the pump and tub of the washer to protect the pump from any moisture falling onto it.

If you have any questions please post them in the comments section below.

If you need to purchase a new drain pump for your washer, visit our store by clicking the link below:

Drain Pump and Motor – W10536347

How To Install & Remove W10189966 Control Board

Removing and installing the W10189966 motor/machine control board in your washer is an easy task.  This control board is used on some Whirlpool Cabrio, Kenmore Oasis, and Maytag Bravos model washers.  When this control board fails, they will commonly come up with an F1 error code repeatedly that won’t go away.

  • First unplug the washer
  • Next, remove the three hex screws from the rear of the top console.
  • Then Lift the console off the cabinet and disconnect the cable going to the user interface board.  This will give you access to the motor/machine control board.
  • Disconnect the nine wire connectors going to the control board and the pressure switch hose (also called a pressure transducer tube).
  • Remove the mounting screw and lift the front of the control, slide it out from under the clips at the back, and remove it.
  • Re-install the new control board in the reverse order.

If you have any questions, please post them in the comments section below.

Visit our store if you need to purchase a new control board for your washing machine by clicking the link below:

Machine/Motor Control – W10189966

Whirlpool/Kenmore Dryer Idler Pulley Squeak

Posted on June 26, 2011

For a few years Whirlpool decided to try using a different style idler pulley (belt tension pulley) on their 29″ wide dryers with the lint filter located on the top of the dryer.  They did this for about 2-3 years, and then they decided to go back to the original idler pulley that they had used for years previously.

This poorly designed idler pulley uses a piece of stamped metal with a plastic/teflon piece attached to it where the belt rides to reduce the friction.  Over time this idler pulley will start to make loud squealing noises or even high pitched whines.  Sometimes the squeak will be louder when the dryer starts, and then go away.  Whirlpool has now gone back to the original design that uses a wheel that fixes this squeaking noise.

Bad Squeaking Idler Pulley

Part to fix the problem.  Part Number PD00002256  (mfg #691366)

For a little bit more you can get a maintenance kit part number PD00002464 (mfg#4392065), that includes the idler pulley, belt, and rear drum rollers.

Whirlpool Washer Doesn’t Spin Out Well

Posted on June 25, 2011

On Whirlpool built direct drive top load washing machines (also built under the Kenmore, Estate, Roper, Inglis, Kitchen Aid, Maytag, and Amana brand names) the motor is directly connected to the transmission and no belt is used.  When people complain that the washer doesn’t seem to spin out the clothes as well as it used to, it is commonly the transmission leaking grease that causes this problem.  What happens is the seal on the top of the transmission goes bad and leaks grease onto the clutch.  Once the grease gets onto the clutch, the clutch doesn’t have enough friction to spin the tub.  Lighter loads will usually spin out better than bigger heavier loads. Continue Reading – To Find Out If Your Washer Is Leaking Grease…

Duet Dryer Takes Too Long To Dry

Posted on June 24, 2011

On Whirlpool Duet and Kenmore Elite HE3 style dryers they will commonly build up with lint inside the blower housing.  The blower housing is underneath where the lint filter on the dryer goes.  To clean out the blower housing you can either stick brush down where the lint filter goes.  Or the better option is to unplug the dryer, remove the lint filter, remove the two screws that hold on the bottom panel of the dryer, and then remove the two-four (depending on the model) screws that hold on the blower housing.  Clean all of the lint out real well and then re-install.

When the blower housing is clogged with lint, the dryer will work less efficiently and clothes will take longer to dry.  Other things a clogged blower housing can cause is blown thermal fuses, heating elements to burn out, and its also a fire hazard.


Parts Dr

Our customers matter a lot to us! So we provide YOU with as much information on repairing your appliance as possible. And its all FREE!

Categories

Locate Model Number

Choose your appliance type