Shipping Options

View more details in our Shipping Policy

All shipping rate advertisements assume delivery to continental US address, and that the part is in stock and is not oversized.

Shipping rates are per order, not per part!

Standard – $10.99
Estimated arrival
Friday Apr 26–May 1
Quicker – $24.99
Estimated arrival
Friday Apr 26
Quickest – $33.99
Estimated arrival
Thursday Apr 25

Category Archives: Refrigerator

W10619951 – Updated Drain Tube Fix Kit

Posted on August 6, 2014

Whirlpool has released a drain tube kit to that is an improved design to the defrost drain tube to keep the defrost drain from clogging and freezing up on some Whirlpool, Kitchen Aid, Jenn Air, Maytag, and Amana refrigerators with the freezer on the bottom (single door and french door).  The new kit uses a “P Trap” instead of the older style duck bill that commonly clogged up over time.  Symptoms of the defrost drain getting clogged are that ice will build up on the bottom of the freezer floor and eventually it will start to leak a small amount of water out of the freezer door and onto the floor.  To check to see if this kit is compatible with your refrigerator, please locate the model number from the model and serial number tag on the inside of the refrigerator and then check the list at the bottom of this post.  If your model number is in the list below and your refrigerator has not been updated to the new style drain tub then we recommend to install this kit to prevent further problems with the defrost drain.  This kit is compatible with all 30″, 33″, and 36″ wide refrigerator model numbers listed at the bottom of this post.  The drain tube kit includes an installation instruction sheet which you can view here.

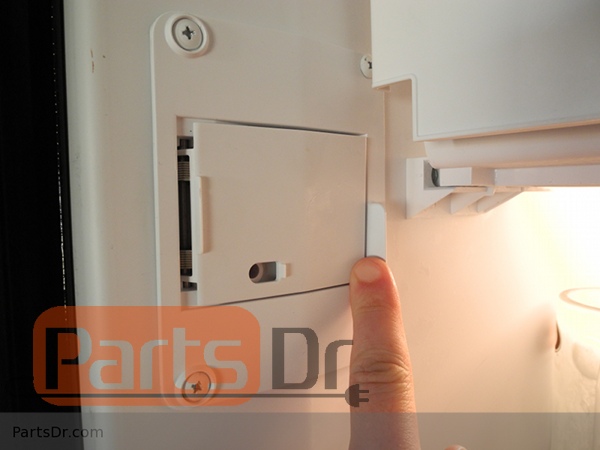
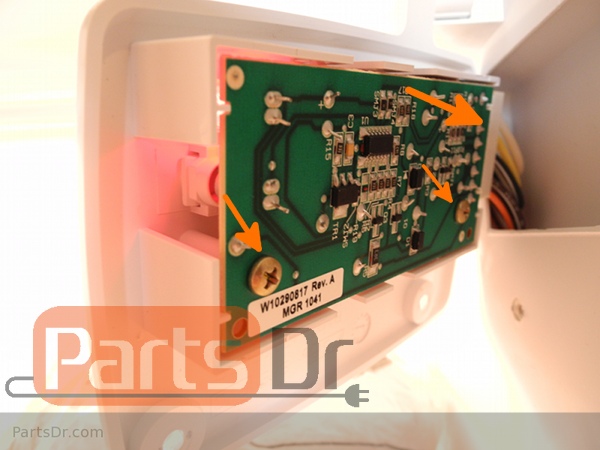
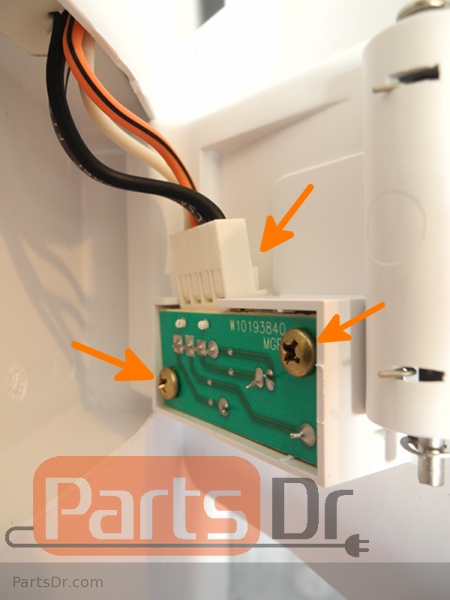
After installing the new drain tube kit, you will need to fully thaw the defrost drain on the refrigerator if the drain is iced up.  There are a few different ways to thaw the defrost drain.  The easiest way to thaw the defrost drain is to unplug the refrigerator and leave the freezer door open for 24 hours.  This should be adequate time for the freezer to warm up and let the ice fully melt.  The other way to thaw the drain is to unplug the refrigerator and remove everything from the freezer.  With everything removed from the freezer you will need to remove the rear cover on the back wall of the freezer.  With this cover removed this will give you access to the defrost drain.  Pour hot water in the drain area until all of the ice has melted and water is able to freely flow down the drain to the back of the refrigerator.

If you need to purchase a drain tube kit, please click the link below to purchase this part from our online store:

Drain Tube Kit – W10619951 (PD00004900)

Model number compatibility list:

5GBB19PRYA0, 5GBB19PRYW0, 5GFC20PRAA00, 5GFC20PRAW00, 5GFF25PRYA0, 5GFF25PRYW0, 5GI6FARAF000, 5GI6FARAF001, 5GX0FHTXAF01, 5KBFS20EAX01, 5KRFX9000M00, 5MFI267AA000, 5MFI267AA001, 5MFX257AA000, 5MFX257AA001, 5VGI6FARAF00, 5VGI6FARAF01, 5VMFI267AA00, 5VMFI267AA01, 5VMFX257AA00, 5VMFX257AA01, 7MI2569VEM1, 7MI2569VEM2, 7MI2569VEM3, 7MI2569VEM4, AB1924PEKB3, AB1924PEKB4, AB1924PEKB5, AB1924PEKS4, AB1924PEKS5, AB1924PEKS6, AB1924PEKS7, AB1924PEKS8, AB1924PEKW3, AB1924PEKW4, AB1924PEKW5, AB2225PEKB3, AB2225PEKB4, AB2225PEKB5, AB2225PEKS4, AB2225PEKS5, AB2225PEKS6, AB2225PEKS7, AB2225PEKS8, AB2225PEKW3, AB2225PEKW4, AB2225PEKW5, AB2526PEKW3, AB2526PEKW4, ABB1921DEW15, ABB1921DEW6, ABB1921FEB12, ABB1921WEW0, ABB1921WEW1, ABB1921WEW2, ABB1921WEW3, ABB1922FEB2, ABB1922FEB3, ABB1922FED1, ABB1922FED2, ABB1922FEQ2, ABB1922FEQ3, ABB1922FEW2, ABB1922FEW3, ABB1924WEB0, ABB1924WEB1, ABB1924WEB2, ABB1924WEB3, ABB1924WED0, ABB1924WED1, ABB1924WEQ0, ABB1924WEQ1, ABB1924WES0, ABB1924WES1, ABB1924WES2, ABB1924WES3, ABB1924WEW0, ABB1924WEW1, ABB1924WEW2, ABB1924WEW3, ABB1927VEB2, ABB1927VEW2, ABB192ZDEB5, ABB192ZDEB6, ABB192ZDEW5, ABB192ZDEW6, ABB192ZWEB0, ABB192ZWEB1, ABB192ZWEW0, ABB192ZWEW1, ABB2221FEB2, ABB2221FEB3, ABB2221FEW2, ABB2221FEW3, ABB2221WEB0, ABB2221WEB1, ABB2221WEW0, ABB2221WEW1, ABB2222FEB2, ABB2222FEB3, ABB2222FED1, ABB2222FED2, ABB2222FEQ2, ABB2222FEQ3, ABB2222FEW2, ABB2222FEW3, ABB2224WEB0, ABB2224WEB1, ABB2224WEB2, ABB2224WEB3, ABB2224WED0, ABB2224WED1, ABB2224WEQ0, ABB2224WEQ1, ABB2224WES0, ABB2224WES1, ABB2224WES2, ABB2224WES3, ABB2224WEW0, ABB2224WEW1, ABB2224WEW2, ABB2224WEW3, ABB2227VEB1, ABB2227VEB2, ABB2227VEW1, ABB2227VEW2, ABB2522FEB2, ABB2522FEB3, ABB2522FEQ2, ABB2522FEQ3, ABB2522FEW2, ABB2522FEW3, ABL1922FES3, ABL1922FES4, ABL1922FES5, ABL1922FES6, ABL1927VES1, ABL1927VES2, ABL1927VES3, ABL1927VES4, ABL192ZFES3, ABL192ZFES4, ABL192ZFES5, ABL192ZFES6, ABL192ZWES0, ABL192ZWES1, ABL2222FES3, ABL2222FES4, ABL2222FES5, ABL2222FES6, ABL2227VES1, ABL2227VES2, ABL2227VES3, ABL2227VES4, ABR1922FES3, ABR1922FES4, ABR1922FES5, ABR1922FES6, ABR1927VES1, ABR1927VES2, ABR1927VES3, ABR1927VES4, ABR192ZFES3, ABR192ZFES4, ABR192ZFES5, ABR192ZFES6, ABR192ZWES0, ABR192ZWES1, ABR2222FES3, ABR2222FES4, ABR2222FES5, ABR2222FES6, ABR2227VES1, ABR2227VES2, ABR2227VES3, ABR2227VES4, AFB2234WEB0, AFB2234WEB10, AFB2234WEB2, AFD2535DEB11, AFD2535DEW11, AFF2534FES3, AFF2534FES4, AFF2534FES5, AFF2534FES6, AFF2534FES7, AFF2534FES8, AFF2534FEW2, AFF2534FEW3, AFF2534FEW4, AFF2534FEW5, AFI2538AEB4, AFI2538AEB5, AFI2538AEQ4, AFI2538AES4, AFI2538AES5, AFI2538AES6, AFI2538AES7, AFI2538AEW4, AFI2538AEW5, CB19G6W00W5, CB19G6W00W6, CB19G7B00B4, CB19G7B00B5, CB19G7W00W4, CB19G7W00W5, EB9FVBLVS01, EB9FVBLWS01, EB9FVBLWS02, EB9FVBLWS03, EB9FVBLWS04, EB9FVBLWS05, EB9FVBLWS06, EB9FVBRVS01, EB9FVBRWS01, EB9FVBRWS02, EB9FVBRWS03, EB9FVBRWS04, EB9FVBRWS05, EB9FVBRWS06, EB9FVBXVB01, EB9FVBXVQ01, EB9FVBXWB00, EB9FVBXWB01, EB9FVBXWB02, EB9FVBXWQ00, EB9FVBXWQ01, EB9FVBXWQ02, EB9FVBXWQ03, EB9FVHLVS01, EB9FVHLVS02, EB9FVHLVS03, EB9FVHLVS04, EB9FVHLWS00, EB9FVHLWS01, EB9FVHLWS02, EB9FVHLWS03, EB9FVHRVS01, EB9FVHRVS02, EB9FVHRVS03, EB9FVHRVS04, EB9FVHRWS00, EB9FVHRWS01, EB9FVHRWS02, EB9FVHRWS03, EB9FVHXVB01, EB9FVHXVB02, EB9FVHXVQ01, EB9FVHXVQ02, EB9FVHXWB00, EB9FVHXWB01, EB9FVHXWB02, EB9FVHXWB03, EB9FVHXWQ00, EB9FVHXWQ01, EB9FVHXWQ02, EB9FVHXWQ03, EB9SHKXVQ01, EB9SHKXVQ02, EB9SHKXVQ03, EB9SHKXVQ04, EB9SHKXVQ05, EB9SHKXVQ06, EB9SHKXVQ07, G20EFSB23S8, G20EFSB23S9, G25EFSB23S4, G25EFSB23S5, G25EFSB23S6, G25EFSB23S7, G25EFSB23S8, G25EFSB23S9, G32026PEKS5, G32026PEKS6, G32026PEKS7, G32026PEKS8, G32026PEKS9, G32026PEKW4, G32026PEKW5, G32026PELB4, G32026PELB5, G32027WEKB3, G32027WEKB4, G32526PEKB3, G32526PEKB4, G32526PEKS4, G32526PEKS5, G32526PEKS6, G32526PEKW3, G32526PEKW4, G37025PEAS1, G37025PEAS2, G37025PEAS3, G37025PEAS4, G37025PEAS5, G37025PEAS6, G37025PEAW1, G37025PEAW2, G37025PEAW3, G37026FEAS1, G37026FEAS2, G37026FEAS3, G37026FEAS4, G37026FEAS5, G37026FEAS6, G37026FEAW1, G37026FEAW2, G37026FEAW3, GB1924PEKB3, GB1924PEKB4, GB1924PEKS4, GB1924PEKS5, GB1924PEKS6, GB1924PEKW3, GB2026LEKS4, GB2026LEKS5, GB2026LEKS6, GB2026LEKS7, GB2026LEKS8, GB2026PEKB3, GB2026PEKB4, GB2026PEKB5, GB2026PEKW3, GB2026PEKW4, GB2026PEKW5, GB2026REKS4, GB2026REKS5, GB2026REKS6, GB2026REKS7, GB2026REKS8, GB2225PEKW3, GB2225PEKW4, GB2526LEKS3, GB2526LEKS4, GB2526LEKS5, GB2526LEKS6, GB2526PEKW3, GB2526PEKW4, GB2526REKS3, GB2526REKS4, GB2526REKS5, GB2526REKS6, GB2FHDXWB00, GB2FHDXWB01, GB2FHDXWB02, GB2FHDXWB03, GB2FHDXWB04, GB2FHDXWB05, GB2FHDXWB06, GB2FHDXWD00, GB2FHDXWD01, GB2FHDXWD02, GB2FHDXWQ00, GB2FHDXWQ01, GB2FHDXWQ02, GB2FHDXWQ03, GB2FHDXWQ04, GB2FHDXWQ05, GB2FHDXWQ06, GB2FHDXWQ07, GB2FHDXWS00, GB2FHDXWS01, GB2FHDXWS02, GB2FHDXWS03, GB2FHDXWS04, GB2FHDXWS05, GB2FHDXWS06, GB2FHDXWS07, GB2FHDXWS08, GB2SHDXTB02, GB2SHDXTB03, GB2SHDXTD01, GB2SHDXTD02, GB2SHDXTQ02, GB2SHDXTQ03, GB2SHDXTS02, GB2SHDXTS03, GB2SHDXTS04, GB2SHTXTB02, GB2SHTXTB03, GB2SHTXTQ02, GB2SHTXTQ03, GB2SHTXTS02, GB2SHTXTS03, GB2SHTXTS04, GB2SHTXTS05, GB5525PEAS1, GB5525PEAS2, GB5525PEAS3, GB5525PEAS4, GB5525PEAS5, GB5525PEAW1, GB5525PEAW2, GB5525PEAW3, GB5526FEAS1, GB5526FEAS2, GB5526FEAS3, GB5526FEAS4, GB5526FEAS5, GB5526FEAW1, GB5526FEAW2, GB5526FEAW3, GB6525PEAS1, GB6525PEAS2, GB6525PEAS3, GB6525PEAS4, GB6525PEAS5, GB6525PEAW1, GB6525PEAW2, GB6525PEAW3, GB6526FEAS1, GB6526FEAS2, GB6526FEAS3, GB6526FEAS4, GB6526FEAS5, GB6526FEAW1, GB6526FEAW2, GB6526FEAW3, GB9FHDXWB00, GB9FHDXWB01, GB9FHDXWB02, GB9FHDXWB03, GB9FHDXWB04, GB9FHDXWB05, GB9FHDXWB06, GB9FHDXWD01, GB9FHDXWQ00, GB9FHDXWQ01, GB9FHDXWQ02, GB9FHDXWQ03, GB9FHDXWQ04, GB9FHDXWQ05, GB9FHDXWQ06, GB9FHDXWS00, GB9FHDXWS01, GB9FHDXWS02, GB9FHDXWS03, GB9FHDXWS04, GB9FHDXWS05, GB9FHDXWS06, GB9FHDXWS07, GB9FHDXWS08, GI0FSAXVA01, GI0FSAXVB01, GI0FSAXVB02, GI0FSAXVB03, GI0FSAXVB04, GI0FSAXVB05, GI0FSAXVB06, GI0FSAXVB07, GI0FSAXVB08, GI0FSAXVB09, GI0FSAXVQ01, GI0FSAXVY01, GI0FSAXVY010, GI0FSAXVY011, GI0FSAXVY02, GI0FSAXVY03, GI0FSAXVY04, GI0FSAXVY05, GI0FSAXVY06, GI0FSAXVY07, GI0FSAXVY08, GI5FSAXVA01, GI5FSAXVB01, GI5FSAXVB02, GI5FSAXVQ01, GI5FSAXVS01, GI5FSAXVS02, GI5FSAXVY01, GI5FSAXVY02, GI5FSAXVY04, GI5FSAXVY05, GI5FVAXVB01, GI5FVAXVB02, GI5FVAXVB03, GI5FVAXVB04, GI5FVAXVL01, GI5FVAXVL02, GI5FVAXVQ01, GI5FVAXVQ02, GI5FVAXYB00, GI5FVAXYQ00, GI5FVAXYY00, GI5SVAXVB01, GI5SVAXVB02, GI5SVAXVB03, GI5SVAXVL01, GI5SVAXVQ01, GI5SVAXVQ02, GI5SVAXVQ03, GI6FARXXB00, GI6FARXXB02, GI6FARXXB03, GI6FARXXB04, GI6FARXXB05, GI6FARXXB06, GI6FARXXB07, GI6FARXXF00, GI6FARXXF01, GI6FARXXF02, GI6FARXXF04, GI6FARXXF05, GI6FARXXF06, GI6FARXXQ00, GI6FARXXQ02, GI6FARXXQ03, GI6FARXXQ04, GI6FARXXQ05, GI6FARXXQ06, GI6FARXXQ07, GI6FARXXY00, GI6FARXXY02, GI6FARXXY03, GI6FARXXY04, GI6FARXXY05, GI6FARXXY06, GI6FARXXY07, GI6FARXXY08, GI6FDRXXB00, GI6FDRXXB01, GI6FDRXXB02, GI6FDRXXB03, GI6FDRXXB04, GI6FDRXXB05, GI6FDRXXB06, GI6FDRXXB08, GI6FDRXXB09, GI6FDRXXQ00, GI6FDRXXQ01, GI6FDRXXQ02, GI6FDRXXQ03, GI6FDRXXQ04, GI6FDRXXQ05, GI6FDRXXQ06, GI6FDRXXQ08, GI6FDRXXQ09, GI6FDRXXY00, GI6FDRXXY01, GI6FDRXXY010, GI6FDRXXY02, GI6FDRXXY03, GI6FDRXXY04, GI6FDRXXY05, GI6FDRXXY06, GI6FDRXXY07, GI6FDRXXY09, GI6SARXXF00, GI6SARXXF01, GI6SARXXF02, GI6SARXXF03, GI6SARXXF04, GI6SARXXF05, GI6SARXXF06, GI6SDRXXB00, GI6SDRXXB01, GI6SDRXXB02, GI6SDRXXB03, GI6SDRXXB04, GI6SDRXXB06, GI6SDRXXQ00, GI6SDRXXQ01, GI6SDRXXQ02, GI6SDRXXQ03, GI6SDRXXQ04, GI6SDRXXQ06, GI6SDRXXV00, GI6SDRXXV01, GI6SDRXXY00, GI6SDRXXY01, GI6SDRXXY02, GI6SDRXXY03, GI6SDRXXY04, GI6SDRXXY05, GI6SDRXXY06, GI6SDRXXY07, GI7FVCXWA00, GI7FVCXWA01, GI7FVCXWA03, GI7FVCXWB00, GI7FVCXWB01, GI7FVCXWB03, GI7FVCXWQ00, GI7FVCXWQ01, GI7FVCXWQ03, GI7FVCXWY00, GI7FVCXWY01, GI7FVCXWY02, GI7FVCXWY03, GI7FVCXWY05, GI7FVCXXA00, GI7FVCXXA01, GI7FVCXXB00, GI7FVCXXB01, GI7FVCXXQ00, GI7FVCXXQ01, GI7FVCXXY00, GI7FVCXXY01, GI7FVCXXY02, GI7FVCXXY03, GX2FHDXVA00, GX2FHDXVA02, GX2FHDXVA03, GX2FHDXVB00, GX2FHDXVB02, GX2FHDXVB03, GX2FHDXVB04, GX2FHDXVB05, GX2FHDXVB06, GX2FHDXVB07, GX2FHDXVB08, GX2FHDXVD00, GX2FHDXVQ00, GX2FHDXVQ02, GX2FHDXVQ03, GX2FHDXVQ04, GX2FHDXVQ05, GX2FHDXVQ06, GX2FHDXVT00, GX2FHDXVT02, GX2FHDXVT03, GX2FHDXVY00, GX2FHDXVY010, GX2FHDXVY02, GX2FHDXVY03, GX2FHDXVY04, GX2FHDXVY05, GX2FHDXVY06, GX2FHDXVY07, GX2FHDXVY08, GX2FHDXVY09, GX2SHBXVB00, GX2SHBXVB02, GX2SHBXVB03, GX2SHBXVB04, GX2SHBXVB05, GX2SHBXVB06, GX2SHBXVB07, GX2SHBXVQ00, GX2SHBXVQ02, GX2SHBXVQ03, GX2SHBXVQ04, GX2SHBXVQ05, GX2SHBXVY00, GX2SHBXVY02, GX2SHBXVY03, GX2SHBXVY04, GX2SHBXVY05, GX2SHBXVY06, GX2SHBXVY07, GX2SHBXVY08, GX2SHBXVY09, GX2SHDXVB00, GX2SHDXVB02, GX2SHDXVD00, GX2SHDXVQ00, GX2SHDXVY00, GX2SHDXVY02, GX5FHDXVA01, GX5FHDXVA02, GX5FHDXVA03, GX5FHDXVA04, GX5FHDXVB01, GX5FHDXVB03, GX5FHDXVB04, GX5FHDXVB05, GX5FHDXVB06, GX5FHDXVB07, GX5FHDXVB08, GX5FHDXVD01, GX5FHDXVD02, GX5FHDXVQ01, GX5FHDXVQ02, GX5FHDXVQ03, GX5FHDXVQ04, GX5FHDXVQ05, GX5FHDXVQ06, GX5FHDXVQ07, GX5FHDXVT01, GX5FHDXVT02, GX5FHDXVY01, GX5FHDXVY010, GX5FHDXVY02, GX5FHDXVY03, GX5FHDXVY04, GX5FHDXVY05, GX5FHDXVY06, GX5FHDXVY07, GX5FHDXVY08, GX5FHDXVY09, GX5FHTXVA01, GX5FHTXVA02, GX5FHTXVA03, GX5FHTXVA04, GX5FHTXVB01, GX5FHTXVB03, GX5FHTXVB04, GX5FHTXVB05, GX5FHTXVB06, GX5FHTXVB07, GX5FHTXVB08, GX5FHTXVQ01, GX5FHTXVQ02, GX5FHTXVQ03, GX5FHTXVQ04, GX5FHTXVQ05, GX5FHTXVQ06, GX5FHTXVQ07, GX5FHTXVY01, GX5FHTXVY010, GX5FHTXVY02, GX5FHTXVY03, GX5FHTXVY04, GX5FHTXVY05, GX5FHTXVY06, GX5FHTXVY07, GX5FHTXVY08, GX5FHTXVY09, GX5SHDXVA01, GX5SHDXVA02, GX5SHDXVB01, GX5SHDXVB03, GX5SHDXVD01, GX5SHDXVD03, GX5SHDXVQ01, GX5SHDXVQ02, GX5SHDXVQ03, GX5SHDXVT01, GX5SHDXVY01, GX5SHDXVY02, GX5SHDXVY03, GX5SHDXVY04, GX5SHDXVY05, GX5SHTXVA01, GX5SHTXVB01, GX5SHTXVQ01, GX5SHTXVY01, GX5SHTXVY02, GZ25FDRXYY0, GZ25FSRXYY0, GZ25FSRXYY1, GZ25FSRXYY2, GZ25FSRXYY4, GZ25FSRXYY5, GZ25FSRXYY6, GZ25FSRXYY7, ITB19440Q03, IX5HHEXWS01, IX5HHEXWS03, IX5HHEXWS04, IX5HHEXWS05, IX5HHEXWS06, IX5HHEXWS07, IX5HHEXWS08, IX5HHEXWS09, IX5HHEXWS10, JBD2286KEB2, JBD2286KEB3, JBL2088HES4, JBL2088HES5, JBL2088WEM0, JBL2088WEM1, JBL2286KES3, JBR2088HES4, JBR2088HES5, JBR2088WEM0, JBR2088WEM1, JBR2286KES3, JFC2089HEP4, JFC2089HEP5, JFC2089HEP6, JFC2089HES4, JFC2089HES5, JFC2089HES6, JFC2089HPF3, JFC2089HPF4, JFC2089HPR2, JFC2089HPR3, JFC2089HPY3, JFC2089HPY4, JFC2089HTB3, JFC2089HTB4, JFC2089HTW3, JFC2089HTW4, JFC2089WEM0, JFC2089WEM1, JFC2089WEM11, JFC2089WEM2, JFC2089WEM3, JFC2089WEM4, JFC2089WEM5, JFC2089WEM6, JFC2089WEM7, JFC2089WEM9, JFC2089WEP0, JFC2089WEP1, JFC2089WEP11, JFC2089WEP2, JFC2089WEP3, JFC2089WEP4, JFC2089WEP5, JFC2089WEP6, JFC2089WEP7, JFC2089WEP9, JFC2089WTB0, JFC2089WTB1, JFC2089WTB2, JFC2089WTB3, JFC2089WTB4, JFC2089WTB5, JFC2089WTB7, JFC2089WTB9, JFC2089WTW0, JFC2089WTW1, JFC2089WTW2, JFC2290VEM1, JFC2290VEM2, JFC2290VEM3, JFC2290VEM4, JFC2290VEM5, JFC2290VEM6, JFC2290VEM7, JFC2290VEM8, JFC2290VEP1, JFC2290VEP2, JFC2290VEP3, JFC2290VEP4, JFC2290VEP5, JFC2290VEP6, JFC2290VEP7, JFC2290VEP8, JFC2290VPF1, JFC2290VPF2, JFC2290VPF3, JFC2290VPF4, JFC2290VPF5, JFC2290VPR0, JFC2290VPR1, JFC2290VPR2, JFC2290VPR3, JFC2290VPR4, JFC2290VPY1, JFC2290VPY2, JFC2290VPY3, JFC2290VPY4, JFC2290VPY5, JFC2290VTB1, JFC2290VTB2, JFC2290VTB3, JFC2290VTB4, JFC2290VTB5, JFD2589KEP3, JFD2589KEP4, JFD2589KEP5, JFD2589KES3, JFD2589KES4, JFD2589KES5, JFI2089AEB2, JFI2089AEP12, JFI2089AEP13, JFI2089AEP2, JFI2089AEP3, JFI2089AEP4, JFI2089AEP5, JFI2089AEP6, JFI2089AEP7, JFI2089AEP8, JFI2089AEP9, JFI2089AES2, JFI2089AES3, JFI2089AEW2, JFI2089ATS2, JFI2089WES0, JFI2089WES1, JFI2089WES2, JFI2089WES3, JFI2089WES4, JFI2089WES5, JFI2089WES6, JFI2089WES8, JFI2089WES9, JFI2089WTS0, JFI2089WTS1, JFI2089WTS2, JFI2089WTS3, JFI2089WTS4, JFI2089WTS6, JFI2089WTS7, JFI2589AEP2, JFI2589AEP3, JFI2589AES2, JFI2589AES3, JFX2597AEM0, JFX2597AEM2, JFX2597AEM3, JFX2597AEP0, JFX2597AEP2, JFX2597AEP3, KBFL25EVMS1, KBFL25EVMS2, KBFS20EVBL1, KBFS20EVBL2, KBFS20EVBL3, KBFS20EVBL4, KBFS20EVBL5, KBFS20EVBL6, KBFS20EVBL8, KBFS20EVMS1, KBFS20EVMS11, KBFS20EVMS13, KBFS20EVMS2, KBFS20EVMS3, KBFS20EVMS4, KBFS20EVMS5, KBFS20EVMS6, KBFS20EVMS7, KBFS20EVMS8, KBFS20EVMS9, KBFS20EVWH1, KBFS20EVWH2, KBFS20EVWH3, KBFS20EVWH4, KBFS20EVWH5, KBFS20EVWH6, KBFS20EVWH8, KBFS22EWBL1, KBFS22EWBL2, KBFS22EWBL3, KBFS22EWBL5, KBFS22EWBL7, KBFS22EWMS1, KBFS22EWMS3, KBFS22EWMS4, KBFS22EWMS5, KBFS22EWMS7, KBFS22EWMS9, KBFS22EWWH1, KBFS22EWWH2, KBFS22EWWH3, KBFS22EWWH5, KBFS22EWWH7, KBFS25EVBL1, KBFS25EVBL2, KBFS25EVMS1, KBFS25EVMS2, KBFS25EVMS3, KBFS25EVMS4, KBFS25EVWH1, KBFS25EVWH2, KBFS25EWBL0, KBFS25EWBL1, KBFS25EWBL2, KBFS25EWBL3, KBFS25EWBL4, KBFS25EWBL5, KBFS25EWBL7, KBFS25EWBL9, KBFS25EWMS0, KBFS25EWMS1, KBFS25EWMS10, KBFS25EWMS2, KBFS25EWMS3, KBFS25EWMS4, KBFS25EWMS5, KBFS25EWMS6, KBFS25EWMS8, KBFS25EWWH0, KBFS25EWWH1, KBFS25EWWH2, KBFS25EWWH3, KBFS25EWWH4, KBFS25EWWH5, KBFS25EWWH7, KBFS25EWWH9, KBLS19KTMS3, KBLS20EVMS1, KBLS20EVMS2, KBLS20EVMS3, KBLS20EVMS4, KBLS20EVMS5, KBLS22EVMS1, KBLS22EVMS2, KBLS22EVMS3, KBLS22KVSS1, KBLS22KVSS2, KBLS22KVSS3, KBLS22KVSS4, KBLS22KWMS4, KBLS22KWMS5, KBLS22KWMS6, KBRL22EVMS4, KBRS19KTBL7, KBRS19KTMS3, KBRS19KTWH7, KBRS20EVBL1, KBRS20EVBL2, KBRS20EVBL3, KBRS20EVBL4, KBRS20EVMS1, KBRS20EVMS2, KBRS20EVMS3, KBRS20EVMS4, KBRS20EVMS5, KBRS20EVMS6, KBRS20EVWH1, KBRS20EVWH2, KBRS20EVWH3, KBRS22EVBL1, KBRS22EVBL2, KBRS22EVMS1, KBRS22EVMS2, KBRS22EVMS3, KBRS22EVMS4, KBRS22EVWH1, KBRS22EVWH2, KBRS22KVBL1, KBRS22KVBL2, KBRS22KVSS1, KBRS22KVSS2, KBRS22KVSS3, KBRS22KVSS4, KBRS22KVWH1, KBRS22KVWH2, KBRS22KWBL4, KBRS22KWBL5, KBRS22KWBL6, KBRS22KWBL7, KBRS22KWMS4, KBRS22KWMS5, KBRS22KWMS6, KBRS22KWWH4, KBRS22KWWH5, KBRS22KWWH6, KBRS22KWWH7, KFCO22EVBL1, KFCO22EVBL2, KFCO22EVBL3, KFCO22EVBL4, KFCO22EVBL5, KFCP22EXMP1, KFCP22EXMP2, KFCP22EXMP3, KFCP22EXMP4, KFCP22EXMP5, KFCS22EVBL1, KFCS22EVBL2, KFCS22EVBL3, KFCS22EVBL4, KFCS22EVBL5, KFCS22EVMS1, KFCS22EVMS2, KFCS22EVMS3, KFCS22EVMS4, KFCS22EVMS5, KFCS22EVMS6, KFCS22EVMS7, KFCS22EVMS8, KFCS22EVWH1, KFCS22EVWH2, KFCS22EVWH3, KFCS22EVWH4, KFCS22EVWH5, KFIL27CXMP0, KFIL27CXMS0, KFIL27CXMS1, KFIL27CXMS2, KFIL27CXMS3, KFIL27CXMS4, KFIL27CXMS5, KFIS20XVBL1, KFIS20XVBL2, KFIS20XVBL3, KFIS20XVBL4, KFIS20XVBL5, KFIS20XVBL6, KFIS20XVBL7, KFIS20XVBL8, KFIS20XVMS1, KFIS20XVMS10, KFIS20XVMS11, KFIS20XVMS2, KFIS20XVMS3, KFIS20XVMS4, KFIS20XVMS5, KFIS20XVMS6, KFIS20XVMS7, KFIS20XVMS8, KFIS20XVWH1, KFIS20XVWH2, KFIS20XVWH3, KFIS20XVWH4, KFIS20XVWH5, KFIS20XVWH7, KFIS20XVWH8, KFIS25XVBL1, KFIS25XVBL2, KFIS25XVBL3, KFIS25XVBL4, KFIS25XVBL5, KFIS25XVBL6, KFIS25XVMS1, KFIS25XVMS10, KFIS25XVMS2, KFIS25XVMS4, KFIS25XVMS5, KFIS25XVMS6, KFIS25XVMS7, KFIS25XVMS8, KFIS25XVMS9, KFIS25XVWH1, KFIS25XVWH2, KFIS25XVWH3, KFIS25XVWH4, KFIS25XVWH5, KFIS25XVWH6, KFIS27CXBL0, KFIS27CXBL1, KFIS27CXBL2, KFIS27CXBL3, KFIS27CXMS0, KFIS27CXMS1, KFIS27CXMS2, KFIS27CXMS3, KFIS27CXMS4, KFIS27CXMS5, KFIS27CXMS6, KFIS27CXWH0, KFIS27CXWH1, KFIS27CXWH2, KFIS27CXWH3, KFXL25RYMS0, KFXL25RYMS1, KFXL25RYMS2, KFXL25RYMS4, KFXS25RYBL0, KFXS25RYBL1, KFXS25RYBL2, KFXS25RYBL4, KFXS25RYBL5, KFXS25RYMS0, KFXS25RYMS1, KFXS25RYMS2, KFXS25RYMS4, KFXS25RYMS5, KFXS25RYWH0, KFXS25RYWH1, KFXS25RYWH2, KFXS25RYWH4, KFXS25RYWH5, KRFC90100B2, KRFC90100B3, KRFC90100B4, KRFC90100B5, MB2216PUAW2, MBB1952HEB1, MBB1952HEW5, MBB1953WEB0, MBB1953WEB1, MBB1953WEB2, MBB1953WEW0, MBB1953WEW1, MBB1953WEW2, MBB1953XEB0, MBB1953XEB1, MBB1953XEW0, MBB1953XEW1, MBB1953XEW2, MBB1953XEW3, MBB1957VEB1, MBB1957VEB2, MBB1957VEW1, MBB1957VEW2, MBB1957WEB0, MBB1957WEB1, MBB1957WEB2, MBB1957WEB3, MBB1957WEW0, MBB1957WEW1, MBB1957WEW2, MBB1957WEW3, MBF1952VEW1, MBF1953YEB0, MBF1953YEB2, MBF1953YEB3, MBF1953YEB4, MBF1953YEW0, MBF1953YEW2, MBF1953YEW3, MBF1953YEW4, MBF1956KEB2, MBF1956KEB3, MBF1956KEB4, MBF1956KEQ2, MBF1956KEQ3, MBF1956KEQ4, MBF1956KEW2, MBF1956KEW3, MBF1956KEW4, MBF1958WEB0,MBF1958XEB4, MBF1958XEB5,MBF1958XES4, MBF1958XES5, MBF1958XEQ1, MBF1958XEW5, MBF2256KEB2, MBF2256KEB3, MBF2256KEQ2, MBF2256KEQ3, MBF2256KEW2, MBF2256KEW3, MBF2258WEB0, MBF2258WEB1, MBF2258WES0, MBF2258WES1, MBF2258WES2, MBF2258WES3, MBF2258WEW0, MBF2258WEW1, MBF2258XEB0, MBF2258XEB1, MBF2258XEB3, MBF2258XEB4, MBF2258XEB5, MBF2258XEQ0, MBF2258XEQ1, MBF2258XEW0, MBF2258XEW1, MBF2258XEW3, MBF2258XEW4, MBF2258XEW5, MBF2556KEB3, MBF2556KEQ3, MBF2556KEW3, MBL1953XES3, MBL1956KES6, MBL1956KES7, MBL1957VES1, MBL1957VES2, MBL1957VES3, MBL1957VES4, MBL1957VES5, MBL1957WES0, MBL1957WES1, MBL1957WES2, MBL1957WES3, MBL2256KES3, MBL2256KES4, MBL2256KES6, MBL2258XES0, MBL2258XES1, MBL2258XES3, MBL2258XES4, MBL2258XES5, MBL2556KES4, MBL2556KES5, MBR1952KES3, MBR1953WES1, MBR1953WES2, MBR1953WES3, MBR1953WES4, MBR1953XES0, MBR1953XES1, MBR1953XES2, MBR1953XES3, MBR1953YES0, MBR1953YES2, MBR1953YES3, MBR1953YES4, MBR1956KES3, MBR1956KES4, MBR1956KES5, MBR1956KES6, MBR1956KES7, MBR1957VES1, MBR1957VES2, MBR1957VES3, MBR1957VES4, MBR1957VES5, MBR1957WES0, MBR1957WES1, MBR1957WES2, MBR1957WES3, MBR2256KES3, MBR2256KES4, MBR2256KES6, MBR2258XES0, MBR2258XES1, MBR2258XES3, MBR2258XES4, MBR2258XES5, MBR2556KES4, MBR2556KES5, MFC2061HEB4, MFC2061HEB5, MFC2061HEW4, MFC2061HEW5, MFC2061KES10, MFC2061KES14, MFC2061KES3, MFC2061KES4, MFC2061KES5, MFC2061KES6, MFC2061KES7, MFC2061KES8, MFC2061KES9, MFD2562VEA1, MFD2562VEA2, MFD2562VEB1, MFD2562VEB3, MFD2562VEB4, MFD2562VEB5, MFD2562VEB6, MFD2562VEB9, MFD2562VEM1, MFD2562VEM11, MFD2562VEM2, MFD2562VEM3, MFD2562VEM4, MFD2562VEM5, MFD2562VEM6, MFD2562VEM7, MFD2562VEM8, MFD2562VEM9, MFD2562VEW1, MFD2562VEW2, MFD2562VEW3, MFD2562VEW4, MFD2562VEW5, MFD2562VEW6, MFD2562VEW8, MFF2258VEA10, MFF2258VEA2, MFF2258VEB10, MFF2258VEB2, MFF2258VEB3, MFF2258VEB4, MFF2258VEB5, MFF2258VEB6, MFF2258VEB7, MFF2258VEB8, MFF2258VEM2, MFF2258VEM3, MFF2258VEM4, MFF2258VEM5, MFF2258VEM6, MFF2258VEM7, MFF2258VEM8, MFF2258VEM9, MFF2258VEW10, MFF2258VEW2, MFF2258VEW3, MFF2258VEW4, MFF2258VEW5, MFF2258VEW6, MFF2258VEW7, MFF2558VEA1, MFF2558VEA2, MFF2558VEB1, MFF2558VEB3, MFF2558VEB4, MFF2558VEB5, MFF2558VEB6, MFF2558VEB7, MFF2558VEB8, MFF2558VEM1, MFF2558VEM10, MFF2558VEM2, MFF2558VEM3, MFF2558VEM4, MFF2558VEM5, MFF2558VEM6, MFF2558VEM9, MFF2558VEQ1, MFF2558VEQ2, MFF2558VEW1, MFF2558VEW2, MFF2558VEW3, MFF2558VEW4, MFF2558VEW5, MFF2558VEW6, MFF2558VEW7, MFI2067AEB4, MFI2067AEB5, MFI2067AEQ4, MFI2067AES10, MFI2067AES11, MFI2067AES4, MFI2067AES5, MFI2067AES6, MFI2067AES7, MFI2067AES8, MFI2067AES9, MFI2067AEW4, MFI2269VEA1, MFI2269VEB1, MFI2269VEB2, MFI2269VEB3, MFI2269VEB4, MFI2269VEB5, MFI2269VEB6, MFI2269VEB7, MFI2269VEB8, MFI2269VEB9, MFI2269VEM1, MFI2269VEM11, MFI2269VEM2, MFI2269VEM3, MFI2269VEM4, MFI2269VEM5, MFI2269VEM6, MFI2269VEM7, MFI2269VEM8, MFI2269VEM9, MFI2269VEQ1, MFI2269VEQ2, MFI2269VEQ3, MFI2269VEQ4, MFI2269VEQ5, MFI2269VEQ7, MFI2269VEQ8, MFI2269VEW1, MFI2269VEW2, MFI2269VEW3, MFI2269VEW4, MFI2269VEW5, MFI2269VEW7, MFI2269VEW8, MFI2569VEA1, MFI2569VEA2, MFI2569VEB1, MFI2569VEB2, MFI2569VEB3, MFI2569VEB4, MFI2569VEM1, MFI2569VEM2, MFI2569VEM3, MFI2569VEM4, MFI2569VEQ1, MFI2569VEQ2, MFI2569VEW1, MFI2569VEW2, MFI2569YEB0, MFI2569YEB1, MFI2569YEB2, MFI2569YEM0, MFI2569YEM1, MFI2569YEM2, MFI2569YEW0, MFI2569YEW1, MFI2569YEW2, MFI2665XEB0, MFI2665XEB1, MFI2665XEB2, MFI2665XEB3, MFI2665XEB4, MFI2665XEB5, MFI2665XEB6, MFI2665XEB7, MFI2665XEM0, MFI2665XEM1, MFI2665XEM2, MFI2665XEM3, MFI2665XEM4, MFI2665XEM5, MFI2665XEM6, MFI2665XEM7, MFI2665XEM8, MFI2665XEW0, MFI2665XEW1, MFI2665XEW2, MFI2665XEW3, MFI2665XEW4, MFI2665XEW5, MFI2665XEW6, MFI2665XEW7, MFI2670XEB0, MFI2670XEB1, MFI2670XEB2, MFI2670XEB3, MFI2670XEB4, MFI2670XEB5, MFI2670XEB6, MFI2670XEB8, MFI2670XEB9, MFI2670XEM0, MFI2670XEM1, MFI2670XEM10, MFI2670XEM2, MFI2670XEM3, MFI2670XEM4, MFI2670XEM5, MFI2670XEM6, MFI2670XEM7, MFI2670XEM9, MFI2670XEW0, MFI2670XEW1, MFI2670XEW2, MFI2670XEW3, MFI2670XEW4, MFI2670XEW5, MFI2670XEW6, MFI2670XEW8, MFI2670XEW9, MFT2771WEB0, MFT2771WEB1, MFT2771WEM0, MFT2771WEM1, MFT2771WEM2, MFT2771WEM3, MFT2771WEW0, MFT2771WEW1, MFT2771XEB0, MFT2771XEB1, MFT2771XEM0, MFT2771XEM1, MFT2771XEW0, MFT2771XEW1, MFX2570AEB0, MFX2570AEB3, MFX2570AEB4, MFX2570AEB5, MFX2570AEM0, MFX2570AEM3, MFX2570AEM4, MFX2570AEM5, MFX2570AEW0, MFX2570AEW3, MFX2570AEW4, MFX2570AEW5, MFX2570XEB0, MFX2571XEB0, MFX2571XEB1, WRX735SDBM00

GE Refrigerator Clicking Noise From Back

Posted on July 14, 2014

Newer style GE refrigerators all use a motherboard on the back side of the refrigerator to control most of the functions on the refrigerator. If you start to hear a constant “clicking” sound every few seconds coming from the back side of the refrigerator, the motherboard might have failed. Pull the refrigerator out while it is still making the noise and listen to where the sound is coming from. You should see a panel on the back of the refrigerator, behind this panel is the control board (make sure not to touch the control board while the refrigerator is plugged in, you may get shocked or electrocuted).

Behind this panel is the control board.
WR55X10942_Install1

If the noise seems to be coming from the control board, then the control board has failed and it will need to be replaced. GE does not sell replacement parts for the control board, so the whole control board must be replaced if there is a problem with the control board. When the control board fails it can cause the refrigerator not to run or cool. It also controls the water dispenser, fan motors, and more. Most of the GE & Hotpoint refrigerators use part number WR55X10942 control board. Some higher end GE model refrigerators with variable speed compressors use part number WR49X10152 for the control board. Replacing the motherboard is easy, and only takes about 15 minutes. Always be sure to look up the correct control board with the model number from the refrigerator first before ordering.

If you need to purchase a control board for you refrigerator please click the link below to visit our parts store.  We usually have the lowest price on the internet for these control boards.  If you have any questions or comments please post them in the comments section below.

GE Refrigerator Main Control Board – WR55X10942

GE WR30X10097 Ice Maker – Service & Replacement Info

Posted on July 11, 2014

One of the most common questions I get asked by customers is about the GE WR30X10097 ice maker found in GE french door refrigerators.  This ice maker will commonly start to make a clicking noise when it fails, and it won’t produce ice properly or won’t make any ice at all.  When something fails on this ice maker, the whole ice maker must be replaced as an assembly; there are no replacement parts sold separately for these ice makers.

How To Replace The Ice Maker

What’s the difference between the Samsung DA97-05422A (Aka IMC701) & GE WR30X10097?

GE Service Bulletin (Model made before 3/1/2008)

I Replaced My Ice Maker And It Still Doesn’t Work

Where Can I Buy A Replacement Ice Maker?

Have More Questions?

How To Replace The WR30X10097 Ice Maker

First unplug your refrigerator, and remove the ice bin container. Remove the Phillips screw on the left side, this will allow you to remove the plastic panel that covers the wiring harness going to the ice maker. Unplug the wire connector going to the ice maker, and then push down on the locking tab on the top of the ice maker while pulling it towards you to remove it. The ice maker should now be free, and you can re-install the new ice maker in the reverse order.

WR30X10097

What’s the difference between the Samsung DA97-05422A (Aka IMC701) & GE WR30X10097 Ice Makers?

If you have already removed your old ice maker, you may have noticed that on the bottom of the ice maker there is a sticker that says Samsung on the bottom of it. Even though the refrigerator is a GE refrigerator, the ice maker was built by Samsung for GE (along with some other components on the refrigerator). The sticker usually says “Model: IMC701”, lists the manufacture date, and lists the DA97-05422A part number in the bottom right corner. You can buy the replacement ice maker from GE, the part number for the replacement ice maker sold by GE is WR30X10097. You can save yourself a lot of money if you buy the same ice maker sold by Samsung. The DA97-05422A is the Samsung part number for the same ice maker.

IMC701Sticker

GE Service Bulletin (Model made before 3/1/2008)

Some GE refrigerator models manufactured before March of 2008 require the ice maker and the main control board to be replaced to prevent further issues. The control board (part number WR55X10763) is replaced with a version that includes a newer software version. These ice makers can have symptoms of ice jamming between the ice maker and the liner, clicking & grinding noises, and low or no ice production. This service bulletin only affects certain model and serial number refrigerators, please make sure yours is part of this service bulletin before ordering the control board.

To access the main control board, you will need to unplug the refrigerator and pull out the refrigerator so you have access to the back side. Remove the screws to the control board cover, and you will have access to look at the tag on the control board to see what software version you have. The control board will need to be replaced if the software version is lower than 4.02. See the service sheet below for more information.

Models Affected: PFSS6 & PFSF6
Manufacture Date: July 2007 – Feb 2008
Serial Numbers: MM070000 – DR079999

WR30X10097 Service Sheet

I Replaced My Ice Maker And It Still Doesn’t Work

There are multiple things that can cause your ice maker not to work. First check to see if you have water flowing to the refrigerator. Check in your owners manual & installation instructions that came with the refrigerator, it should state how much water pressure should be at the refrigerator. Low water pressure can make small ice cubes which can cause ice maker failures. If you have a water filter system in your house, then make sure you bypass the water filter inside the refrigerator. Doubling up on filters only lowers the water pressure further. If you haven’t replaced your water filter in the last 6-12 months, then replacing the water filter can help improve water flow. Most GE refrigerator models use the MWF water filter. The other components that work with the ice maker to make ice are the water inlet valve, and the main control board on the refrigerator. The temperature in the ice maker compartment must be less than 10°F to work properly. To check the temperature you should put an accurate thermometer in the ice bin for a few hours to see if it is cooling down to the proper temperature.

On the side of the ice maker is a test switch. Firmly press this button for a few seconds and the ice maker should go through a harvest cycle by dumping out the ice in the ice maker and filling up with water again.

WR30X10097TestBtn

Where Can I Buy A Replacement Ice Maker?

You can buy a replacement ice maker from our website, please click the link below. Parts Dr always has the lowest prices for new O.E.M. replacement parts.

Samsung Ice Maker – DA97-05422A (IMC701)

Questions or Comments?

Have Any Questions?  Please post them in the comments section below and one of our experts will answer your question as soon as possible.

W10503278 Control Board – Service & Replacement Info

Posted on

The W10503278 control board is found on some Whirlpool built refrigerators with the freezer on the bottom. It can be found in Admiral, Amana, Jenn Air, Kenmore, Kitchen Aid, Maytag, and Whirlpool brand refrigerators. This control board controls most of the main functions on the refrigerator. It takes the place of a defrost timer and controls the automatic defrost cycle. It also controls the compressor, refrigerator & freezer temperatures, and the evaporator and condenser fan motors.

How To Replace The W10503278 Control Board

First, unplug the refrigerator before working on it.

Then remove the light cover by sliding it towards the back of the refrigerator.

12868513_install2

Next depress the two tabs through the two slots on the back side of the light housing with a flat head screw driver.  This will allow the control board housing to flip down.  Then remove the two wire connectors to the control board.

12868513_install3

Now depress the two tabs that lock in the two separate sections of the control board.  Remove the old control board, and re-install the new control board.

12868513_install4

The new control board comes as one piece, and you will have to snap the board at the break line to separate the new control board into two pieces before installing.  Once this is done, you can re-install everything in the reverse order.

With the new control panel installed, you will need to follow these instructions to program the control board to work with your refrigerator.

If you need to purchase a new W10503278 control board for your refrigerator, you can click the link below:

Control Board – W10503278

12784415_4

W10757851 Ice Level Optics Board Diagnostics & Replacement

Posted on

Whirlpool built refrigerators (also found on Jenn Air, Kenmore, Kitchen Aid, and Maytag brand refrigerators) with the ice bin located in the door use two optic control boards (part# W10757851) to tell when the ice bin is full of ice. There is an emitter control board that sends out an infrared beam, and a receiver board that receives the infrared beam. When the ice container fills up with ice, the beam is blocked, and it tells the ice maker to stop filling up with ice. If the ice maker optic control boards fail, it can cause the ice maker to continue to make ice even when it is full of ice or turned off, or it can cause the ice maker to not produce any ice at all. The optics control boards are replaced as a set, even if only one of the two control boards are bad, both will need to be replaced.

How To Test The Whirlpool Ice Maker Optic Control Boards W10757851

First, open the freezer door and look at the status LED on the right hand side. Make sure the ice maker control is turned “ON”. The status LED should blink twice, pause, and then repeat (blink blink…. pause. blink blink… pause).

4389102_diagnostics1

Next, with the freezer door open, hold down the flapper door on the left hand side to un-block the optics beam.  With the optics beam unblocked, the status LED should light up and stay on (not blink).  If the status LED continues to blink twice, then you have faulty optic control boards and they will need to be replaced.

4389102_diagnostics3

If there is no status LED light, then the ice maker could be in “harvest” mode.  Hold down the freezer light switch, the status LED should flash every second while in harvest mode.  If the LED light still does not light up, then the optic control boards will need to be replaced.

How To Replace The Whirlpool Ice Maker Optic Control Boards W10757851

First, unplug the refrigerator.

Remove the three Phillips screws on the right hand side.

4389102_replacement1

Disconnect the wire harness on the back side and then remove the two Phillips screws to release the receiver control board from the housing.  Re-install the receiver board in the reverse order.

4389102_replacement2

Next, remove the three Phillips screws on the left hand side.

4389102_replacement3

Disconnect the wire harness on the top side and then remove the two Phillips screws to release the emitter control board from the housing.  Re-install the emitter board in the reverse order.

4389102_replacement4

Do you need to replace the optic control boards?  Click the link below to visit our store and purchase new ones.  Be careful when shopping around for this part, as many stores sell a lower quality knockoff version of this part.  You can be assured when you order the optics control board kit from Parts Dr that you are receiving a new OEM part.

Ice Level Optics Control Board Kit – Part # W10757851


How To Test a GE Refrigerator Thermistor Sensor WR55X10025

Posted on

Some newer GE model refrigerators manufactured after 2002 use a thermistor in the refrigerator and freezer sections to control the temperature and the automatic defrost cycle. The thermistor is a variable resistor that varies its resistance depending on the temperature. It is sometimes referred to as a temperature sensor. GE used these thermistors on some Side-by-Side, bottom freezer, and top freezer refrigerator models that use a main control board on the back of the refrigerator. The main control board monitors and reads all of the thermistors to properly control all of the functions of the refrigerator. Please note that all of the thermistors on these models are the same.

**Before working on your refrigerator, make sure the refrigerator is unplugged.**

Thermistor Locations & Functions

Refrigerator Section: The refrigerator may have one or two thermistors located in different areas to monitor the temperature in the refrigerator section. These sensors send their signal to the main control board, which may turn on/off the compressor or evaporator fan motor, or open/close the air damper to let more or less cold air into the refrigerator compartment. When one of these sensors fails, it can cause the temperature to be off or even cause the refrigerator not to run (not very common).

Freezer Section: The freezer section has one thermistor sensor, not including the thermistor on the evaporator coil (see below). This sensor sends its signal to the main control board which may turn the compressor on/off or turn the evaporator fan motor on/off. When this sensor fails, it can cause the temperature to be off or even cause the refrigerator not to run (not very common).

Evaporator Coil: The evaporator coil (located behind the back panel in the freezer section) has one thermistor sensor attached to the top side of the evaporator coil. The control board monitors this thermistor and uses it to know when to go in and out of the automatic defrost cycle. Some people refer to this thermistor as the defrost sensor. This is the most common sensor to fail because it is subject to extreme temperature changes and moisture. When this sensor fails it can cause the refrigerator to not go through the automatic defrost cycle properly. When replacing this sensor, you must first manually defrost the evaporator coil to get it caught back up for the refrigerator to continue to work properly going forward.

Old Style Vs. New Style Thermistor

Some refrigerator manufactured 2005 and earlier may have a thermistor design that is prone to failure. The differences between the old and new style thermistor is easy to spot. The old style thermistor has a black area around where the wires come out of the sensor and it also has a rounded tip. The new style sensor is white around where the wires come out of the sensor and the tip of the sensor is flat. If your refrigerator has the old style thermistor sensors, then you should change out all of the thermistors with the new style sensor.

The old style thermistor is pictured on the left with a round tip and the new style thermistor is pictured on the right with a flat tip.

WR55X10025

The old style thermistor is pictured on the left with a round tip and the new style thermistor is pictured on the right with a flat tip.

WR55X10025_2

How To Test The Thermistor

You can test your thermistor(s) using an ohm meter or multi-meter. The best way to do this is to remove the thermistor from the refrigerator so you can control the temperature of the sensor. You can let the sensor warm up to room temperature or grab a glass of ice water to test the thermistor. With the sensor warmed up to room temperature the sensor should read approximately 6.2K Ohms at 68°F. With the thermistor submerged is a glass full of ice water, the sensor should be very close to 32°F which should read approximately 16.3K Ohms. If the values that you are getting are far off from these readings, then the sensor is bad and should be replaced. If the reading you are getting is not consistent; where sometimes the ohm reading is correct and other times it isn’t, even though the temperature hasn’t changed, then the thermistor should be replaced.

Where to Buy

The common thermistor used on some GE refrigerators is part number WR55X10025. Thermistors are model specific and should be verified with the model number of the refrigerator before ordering. This is the newest version of this part, and has been improved to have less problems. Click the link below to visit our store to purchase a replacement thermistor sensor.

Temperature Sensor (Thermistor) – Part # WR55X10025

How To Install GE WR55X10942 Main Control Board

Installing and replacing the WR55X10942 GE Refrigerator Main control board is an easy task and normally only takes about 15 minutes.  The main control board is located on the back side of the refrigerator behind a cover panel.  This circuit board controls almost all of the functions on the refrigerator.

This is how to replace the control board:

First unplug the refrigerator.

Next remove the screws securing the cover on the back side of the refrigerator.

Then remove the two bottom electrical connectors.

Next you will need to remove the control board from the plastic pins that secure the board to the refrigerator.  Push in on the side of the pin (or squeeze it with a needle nose pliers)  while gently pulling out on the control board at the same time.  Most boards have 4 – 6 pins that secure the control board.

Now pull the old control board off to the side and place the new control board in its place.  Make sure all the plastic pins secure the new board into place.  Now you can start transferring the wiring connectors from the old board to the new control board.  Don’t forget to plug in the two bottom connectors that you removed earlier.

Here is the new board all hooked up.

Please note that on some models you may have left over spots where you will not have any connectors to plug into them.  This is normal.  All of the plugs have different amounts of pins, so if you are unsure where a connector goes, you can count the pins to match up where it should go.

Included with your new control board is an instructions sheet.  Please read through this sheet completely and follow any steps that apply to your model.  These changes affect some side by side and some bottom freezer models.

If your model has a wire going into pin 2 on the 9 pin connector, you will need to cut this wire or you refrigerator section will not cool down to the proper temperature.  Check your model/serial number to see if yours is listed on the instruction sheet. (Note:  I have also seen models that were not listed on the sheet that needed to have this wire cut also).

On some bottom freezer models you may also have to cut a green wire.  Please follow the instructions included with the control board to see if your model requires this.

Re-install the back cover panel on the refrigerator, make sure the ground wire from the control board is grounded to one of the screws.

Plug in the refrigerator and test to make sure it is operating properly.

If you need to purchase a control board for you refrigerator please click the link below to visit our parts store.  We usually have the lowest price on the internet for these control boards.  If you have any questions or comments please post them in the comments section below.

GE Refrigerator Main Control Board – WR55X10942P

Frigidaire & Kenmore Garage Refrigerator Heater Kit 5303918301

Frigidaire and some Kenmore refrigerators offer a garage heater kit to keep the refrigerator operating at temperatures down to 34°F.  Without the garage heater kit, the manufacturer states that the refrigerator may not work correctly at temperatures below 55°F (13°C).  So if you plan to keep your refrigerator in a cold garage in the winter time or any other unheated area, you will want to install the garage kit that Frigidaire/Kenmore offer to keep your refrigerator working properly.  The garage heater kit is installed in the refrigerator section next to the thermostat & defrost timer.

Note: This is not designed to work with side-by-side, counter-depth refrigerators, models with electronic controls, or those made before 2001.  Only top freezer refrigerator models can use this heater designed for those put in garages or basements where the temperature drops to 34 degrees Fahrenheit.

The manufacture part number for the garage kit is 5303918301, and it can be purchased from our online store by clicking the link below:

Garage Refrigerator Heater Kit – MFG Part # 5303918301 (Part # PD00000271)

Before working on your appliance, make sure that it is unplugged.  Below are step by step instructions on how to install the garage heater kit.
5303918301_1
5303918301_2
5303918301_3
5303918301_4

How To Remove Samsung IMC701 DA97-05422A Ice Maker

Removing and installing a new Samsung DA97-05422A (IMC701) ice maker on a french door refrigerator is a pretty easy task.  This ice maker will often fail and make a clicking noise when it breaks.  First unplug the refrigerator.  Then remove the screw on the left, this will allow you to pull off the side panel and unplug the connector that goes to the ice maker.  Next pull the locking tab down on the ice maker while pulling the ice maker towards you.  This will release it.  Re-install the new ice maker in the reverse order.

*Note, this ice maker has the letters IMC701 written on the bottom.  Parts are not available for this ice maker separately, if something breaks, the whole ice maker must be replaced

If you have a bad ice maker and need to purchase a new one, click the link below:

DA97-05422A Ice Maker (7 Cube Ice Maker)


Samsung Blinking Dash/Line Error Code List

Posted on July 16, 2011

Samsung refrigerators will start to blink a Dash or Line on the display when they there is an error code.  For example, if #12 in the diagram below was blinking then the computer thinks that there is a problem with the condenser fan motor.  Keep in mind that error codes are a starting point, and replacing the part related to the problem does not always fix the problem.  There can be a problem with the stated part, wiring, main PCB control board, and sometimes even an un-related part.  If you are unsure you should hire a technician to properly diagnose the problem.

(Click Diagram To Enlarge)

1: Ice maker sensor -Ice Maker sensor connector missing, contact failure, electric wire cut, short-circuit, Ice Maker sensor failure, and so on.  Indicates an error when the temperature sensed by Ice Maker sensor is higher than 150℉ or lower than –58℉.

2: Refrigerator Sensor – Refrigerator sensor connector missing; contact failure, electric wire cut, short- circuit, Refrigerator sensor itself failure; and so on. Indicate Error when the temperature sensed by Refrigerator sensor is higher than 150℉or lower than –58℉.

3: Refrigerator Defrost Sensor – Refrigerator evaporator internal defrosting sensor connector missing, contact failure, electric wire cut, short-circuit, sensor itself failure; and so on.  Indicate Error when the temperature sensed by Refrigerator defrosting sensor is higher than 150℉or lower than –58℉.

4: Refrigerator Fan Error – Refrigerator Fan motor operation failure, feedback signal line contact failed, electric wire cut, short- circuit, and so on.  Indicates an error if the F and G signals generated by the FAN-motor operation are not input.

5: Ice Maker Function Error – Ice-ejector and level failed three times or more

6:  CoolSelect Zone Sensor – CoolSelect ZoneTM sensor connector missing, contact failed, electric wire cut, short-circuit, CoolSelect ZoneTM sensor itself failed, and so on. Indicates an error when the temperature sensed by CoolSelect ZoneTM sensor is higher than 150℉or lower than –58℉.

7: Refrigerator Defrost Error – In the refrigerator room, if frost removal mode is finished due to limited time of 80 minutes. Error is displayed.

8: Exit-Sensor – Air sensor connector missing; contact failure, electric wire cut, short-circuit, open air sensor itself failure, and so on.  Indicates an Error when the temperature sensed by the open air sensor is higher than 150℉or lower than –58℉.

9: Freezer Sensor – Freezer sensor connector missing, contact failed, electric wire cut, short-circuit, Freezer Room sensor itself failure.  Indicate Error when the temperature sensed by Freezer sensor is higher than 150℉ or lower than –58℉.

10: Freezer Defrost Error – Freezer evaporator defrosting sensor connector missing, contact failed, electric wire cut, short- circuit, sensor itself failure, and so on.  Indicates an error when the temperature sensed by Freezer defrosting sensor is higher than 150℉or lower than –58℉.

11: Freezer Fan Error – Freezer Fan motor operation failure, feedback signal line contact failure, motor’s electric wire missing, and so on.  Indicate Error if the F and G signals generated by the FAN-motor operation are not input.

12: Condensor Fan Error  – Condenser Fan motor operation failure, feedback signal line contact failure, motor’s electric wire missing, and so on.  Indicates an error if the F and G signals generated by the FAN- motor operation are not input.

13: Freezer Defrost Error – In the freezer room, if frost removal mode is finished due to limited time of 70 minutes. Error is displayed.

Parts Dr

Our customers matter a lot to us! So we provide YOU with as much information on repairing your appliance as possible. And its all FREE!

Categories

Locate Model Number

Choose your appliance type