Shipping Options

View more details in our Shipping Policy

All shipping rate advertisements assume delivery to continental US address, and that the part is in stock and is not oversized.

Shipping rates are per order, not per part!

Standard – $10.99
Estimated arrival
Monday Apr 29–May 2
Quicker – $24.99
Estimated arrival
Monday Apr 29
Quickest – $33.99
Estimated arrival
Friday Apr 26

Tag Archives: Washer

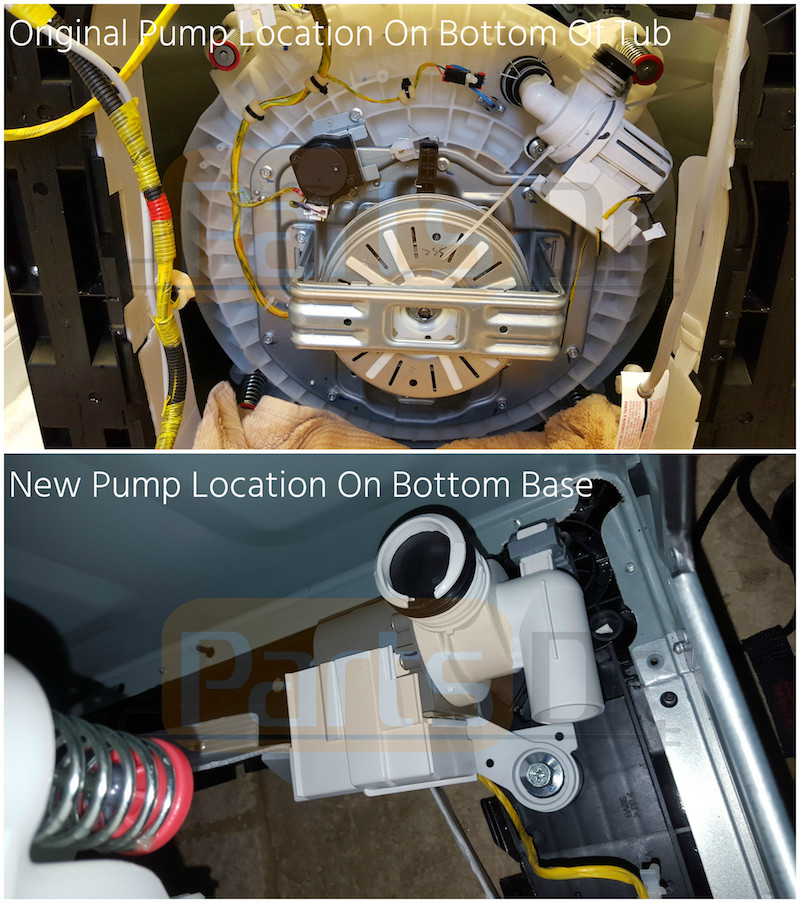
Samsung Drain Pump Relocation Kit

Posted on July 19, 2014

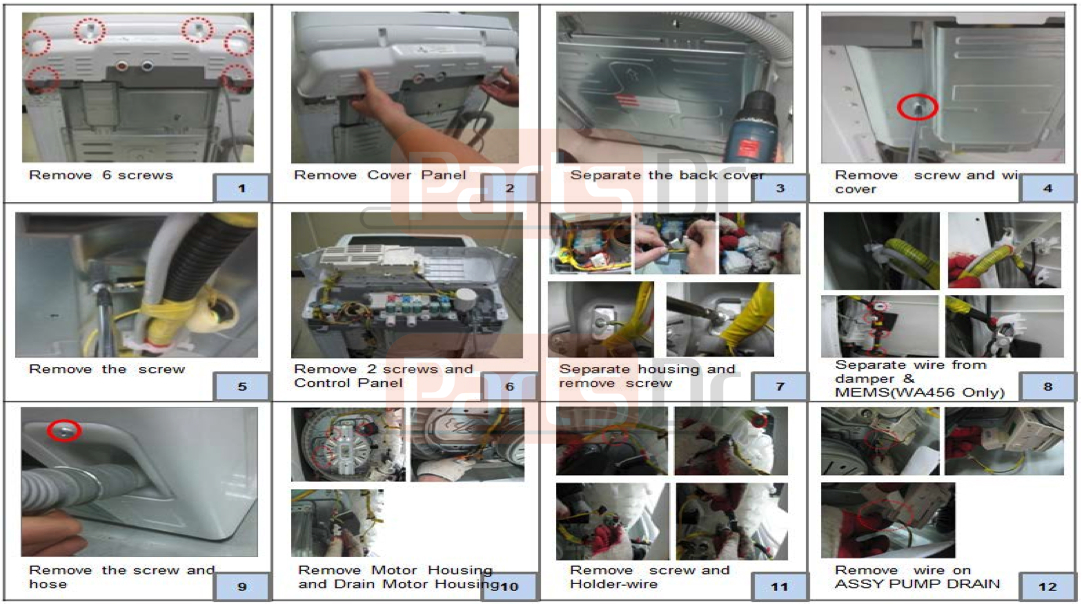
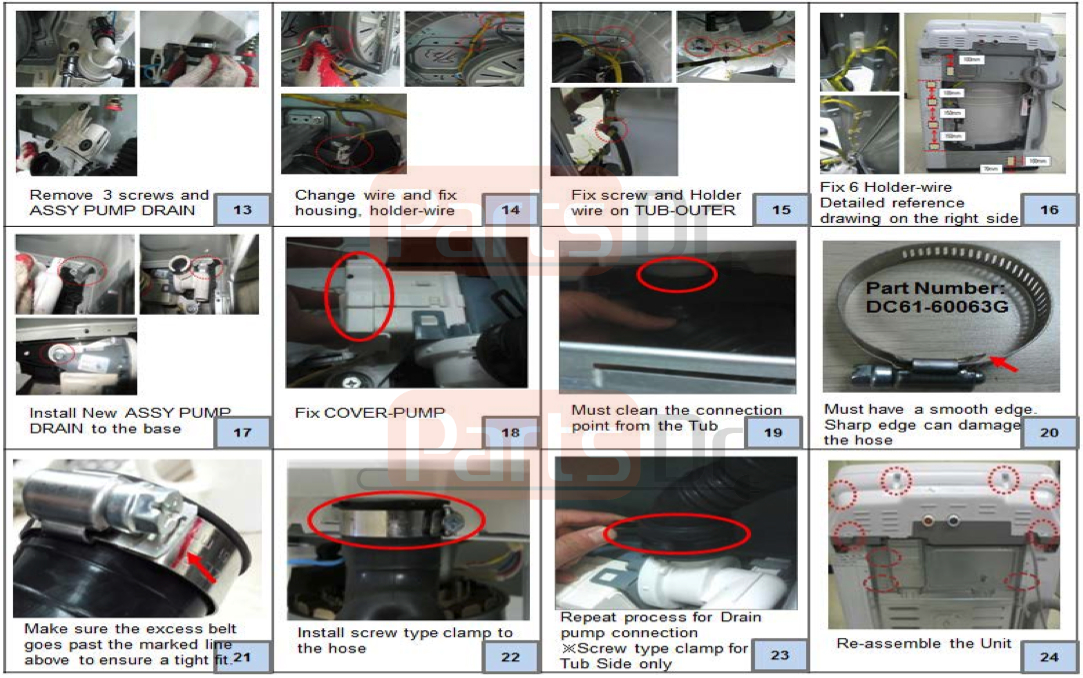
To improve quality Samsung has relocated the drain pump assembly from the bottom of the tub to the base of the washer on certain model numbers and production dates.  Previously these washers used part number DC97-16985A for the drain pump but this pump has been discontinued and replaced with one of the two service kits part # DC98-01877A or DC98-01877B depending on the model number and manufacture date of the washer.  First locate your model and serial number tag on the washing machine.  This tag is located on the top back console of the washer, and it will list the model number, serial number, and manufacture date. The manufacture date is listed in the format of YYYY.MM (ex: 2012.06).  Below is an example model and serial number tag to show where the manufacture date is located.

tag

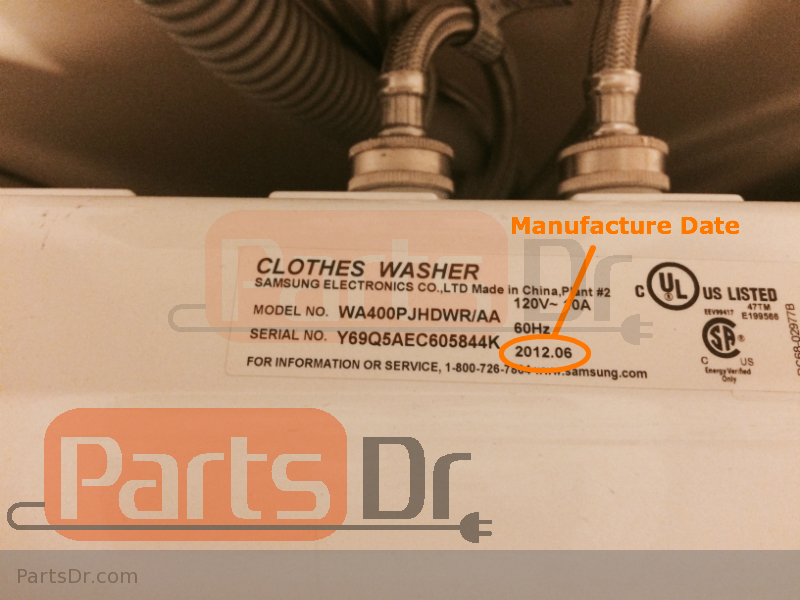
If the washer was manufactured before 12/9/2012 and you have one of the qualifying models, then you will need to order the corresponding drain pump kit listed in the chart below.  Washers manufactured 12/10/2012 and later use part number PD00030925 for the drain pump and do not require the drain pump relocation kit.  Please not that the manufacture date is listed in the format of YYYY.MM (ex: 2012.06) on the tag of the washer and it will not show the day it was manufactured.  If the washer was manufactured in the month of December of 2012 you will need to check the washer to see if the pump is located on the bottom of the tub.  If the pump is located on the bottom of the tub you will need to order a drain pump relocation kit.  For installation instructions, please see the bottom of this post.

Model Code Manufacture Date BOM Version Use Part #
WA400PJHDWR/AA 12/9/2012 or Earlier 000  PD00004957
WA422PRHDWR/AA 12/9/2012 or Earlier 000  PD00004957
WA456DRHDSU/AA 12/9/2012 or Earlier 000 PD00004977
WA456DRHDWR/AA 12/9/2012 or Earlier 000 PD00004977

When the drain pump fails it can cause water to leak from the pump or it can cause the water not to drain out of the washing machine.

If you need to order one of the drain pump kits, you can click one of the links in the the above chart, or one of the links below. Parts Dr always has the lowest prices on OEM appliances parts.

Drain Pump Kit – PD00004957 (MFG# DC98-01877B)

Models WA400PJHDWR/AA & WA422PRHDWR/AA manufactured before 12/9/2012.

Drain Pump Kit –  PD00004977 (MFG# DC98-01877A)

Models WA456DRHDSU/AA & WA456DRHDWR/AA manufactured before 12/9/2012.

The photo below shows the location of the old pump and the location of where the new pump is relocated to.
newvsoldpumplocations
Before working on your appliance, make sure that it is unplugged.  Below are step by step instructions on how to install the new drain pump kit.

Pump Instructions 1

Pump Instructions 2

How To Remove & Install 131763202 Door Lock Latch

The Frigidaire door lock/latch 131763202 has been used on many different models of washers over the years.  Removing and installing this part is an easy that only takes a few minutes. No need to call Keys 4 The City locksmiths or a repair service, you can handle this one. These are some of the symptoms you can experience when the door latch/lock fails:  door won’t lock, door won’t unlock, E47 error code, agitates but won’t spin, and more.

Here is how to replace the door lock/latch assembly:

Always unplug your appliance before working on it.  First open the door and remove the two phillips screws.

Next remove the door boot seal clamp and peal back the door boot to give you access to the door lock.  You should be able to pull the door lock out and remove the three wire connectors that plug into the door latch.

Re-install the parts in the reverse order and test out the washer to make sure that it is operating correctly.

If you have a bad door lock/latch and need to purchase a new one, click the link below:

Door Lock Latch/Switch Assembly – 131763202

How To Remove & Install Drain Pump W10536347

Removing drain pump part number W10536347 is a simple task.  When this pump fails, the washer will display “LD” on the display which means “Long Drain”.  This pump can be found on Whirlpool Cabrio, Maytag Bravos, and Kenmore Oasis model washing machines.  The pump can fail if something gets stuck in the pump (coin, clothing item, ect), and sometimes you can get lucky and just remove the object that was stuck in the pump.  Other times the pump can break, so make sure so inspect the pump before putting it back in the washer.

How to the remove the drain pump:

  1. Unplug the washer
  2. Next, you will need to remove any water still in the washer (use a wetvac, bucket, towels, ect to do this)
  3. Turn off the water supply going to the washer & disconnect the hot & cold fill hoses to the washer
  4. Remove the drain hose from the wall or drain tub
  5. Tape the lid shut (so the lid doesn’t pop open)
  6. Carefully lay the washer down on its front side (place some towels or rugs on the floor to protect the washer).
  7. Note:  On the bottom side of the washer, the drain pump is the larger of the two pumps (the recirculation pump is the smaller one).
  8. Remove the drain hose (discharge hose) from the pump.  Loose then clamp and pull off the hose.  Note there is a notch in the hose to line up when you put the hose back on.
  9. Remove the inlet hose to the pump.  Loosen the clamp and remove the hose from the pump.
  10. Open the end cover on the pump and remove the wire connector.
  11. Remove the three 5/16″ screws securing the pump.
  12. The pump should now be free.  Check to see if anything is caught in the impeller.  If you notice any damage, or the pump still does not work then you will need to replace the drain pump assembly.
  13. Re-install in the reverse order.  NOTE:  The new pump includes a shield cover that goes between the pump and tub of the washer to protect the pump from any moisture falling onto it.

If you have any questions please post them in the comments section below.

If you need to purchase a new drain pump for your washer, visit our store by clicking the link below:

Drain Pump and Motor – W10536347

LG Washer Hall Senor Location

Posted on July 17, 2011

LG Hall Sensor 6501KW2002A Location

The hall sensor (6501KW2002A) on the LG front load washing machines is located on the bottom back side of the stator.  Unplug the washer, then to access it you have to remove the back panel of the washer, remove the rotor (single large bolt), then remove the stator (6 smaller bolts), unplug the two connectors and remove the ground and you can pull the stator off to access the hall sensor.  The hall sensor just clips on, so you just have to unclip the old one and clip on the new one.

The Hall Sensor is a Rotor Position Sensor (RPS), it tells the computer what position the rotor is in.  The computer uses this to see how fast the drum is spinning along with other things.  When the Hall Sensor goes bad, it will commonly give an LE error (Locked Rotor error) on the washer.  When the sensor goes bad it can cause the drum not to drum properly and even make the washer make some strange growling noises.

If you have any questions, post them in the comments below.  If you need to purchase a Hall Sensor for your LG washer, visit the link below.

Hall Sensor – 6501KW2002A

Whirlpool Appliance Age – Serial Number Decoder

Posted on July 2, 2011

In order to find the age of a Whirlpool built appliance you will need the serial number from the appliance.  Since Whirlpool manufactures appliances under many different names, this may work with some of these brand names also:

Whirlpool, Kenmore (Sears), Maytag (Newer models), Kitchen Aid, Estate, Inglis, Roper, Amana, Jenn Air, Crosley and more.

Please do not contact our company for assistance trying to determine the age of your appliance as we will be unable to help.  If the information on this page does not answer your question please contact the manufacture directly for futher assistance.

Serial Number Example:

CR3949348

1st Digit: Where the appliance was manufactured. C = Clyde, OH.

2nd Digit: Year Manufactured.  R = 2004

3rd & 4th Digit: Week the appliance was manufactured.  39 = 39th week of the year.

5th-9th Digit: Manufacture order that week

See the charts below for the year codes:

Whirlpool Model Number Codes
A letter in the model number indicates the year the model was introduced. Please note that the year the model was introduced to NOT indicate the production date. For models 1981 and older you will reference the 2nd character in the model number, and on models produced after 1981 you will reference the 8th character in the model number. Please reference the charts below for the year codes:

GE Washer Won’t Agitate – Air Bell Coupler

Posted on June 28, 2011

Some GE built washing machines use a piece called a air bell coupling to connect the agitator to the transmission.  To access this part you need to remove the agitator, to do this you need to grab the base of the agitator and firmly pull up on it.  There are no bolts/nuts holding it down.  Once the agitator has been removed you will see the air bell coupler, there is a single bolt on the top of it to remove it.  With the air bell coupling removed take a close look at the splines on the inside of it, the splines should go ALL the way through.  If any of it is stripped out, then it needs to be replaced.

Notice in the picture above that the splines only go for about 1/8″ before it strips out.  Past that it is all rounded out on the inside.  That is what will cause the agitator not to move.

Whirlpool Washer Doesn’t Spin Out Well

Posted on June 25, 2011

On Whirlpool built direct drive top load washing machines (also built under the Kenmore, Estate, Roper, Inglis, Kitchen Aid, Maytag, and Amana brand names) the motor is directly connected to the transmission and no belt is used.  When people complain that the washer doesn’t seem to spin out the clothes as well as it used to, it is commonly the transmission leaking grease that causes this problem.  What happens is the seal on the top of the transmission goes bad and leaks grease onto the clutch.  Once the grease gets onto the clutch, the clutch doesn’t have enough friction to spin the tub.  Lighter loads will usually spin out better than bigger heavier loads. Continue Reading – To Find Out If Your Washer Is Leaking Grease…

Parts Dr

Our customers matter a lot to us! So we provide YOU with as much information on repairing your appliance as possible. And its all FREE!

Categories

Locate Model Number

Choose your appliance type