Shipping Options

View more details in our Shipping Policy

All shipping rate advertisements assume delivery to continental US address, and that the part is in stock and is not oversized.

Shipping rates are per order, not per part!

Standard – $10.99
Estimated arrival
Monday Apr 22–25
Quicker – $24.99
Estimated arrival
Monday Apr 22
Quickest – $33.99
Estimated arrival
Friday Apr 19

Tag Archives: Hotpoint

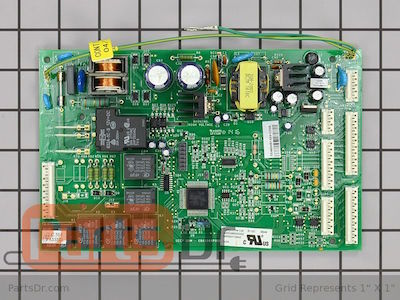
How To Install GE WR55X10942 Main Control Board

Installing and replacing the WR55X10942 GE Refrigerator Main control board is an easy task and normally only takes about 15 minutes.  The main control board is located on the back side of the refrigerator behind a cover panel.  This circuit board controls almost all of the functions on the refrigerator.

This is how to replace the control board:

First unplug the refrigerator.

Next remove the screws securing the cover on the back side of the refrigerator.

Then remove the two bottom electrical connectors.

Next you will need to remove the control board from the plastic pins that secure the board to the refrigerator.  Push in on the side of the pin (or squeeze it with a needle nose pliers)  while gently pulling out on the control board at the same time.  Most boards have 4 – 6 pins that secure the control board.

Now pull the old control board off to the side and place the new control board in its place.  Make sure all the plastic pins secure the new board into place.  Now you can start transferring the wiring connectors from the old board to the new control board.  Don’t forget to plug in the two bottom connectors that you removed earlier.

Here is the new board all hooked up.

Please note that on some models you may have left over spots where you will not have any connectors to plug into them.  This is normal.  All of the plugs have different amounts of pins, so if you are unsure where a connector goes, you can count the pins to match up where it should go.

Included with your new control board is an instructions sheet.  Please read through this sheet completely and follow any steps that apply to your model.  These changes affect some side by side and some bottom freezer models.

If your model has a wire going into pin 2 on the 9 pin connector, you will need to cut this wire or you refrigerator section will not cool down to the proper temperature.  Check your model/serial number to see if yours is listed on the instruction sheet. (Note:  I have also seen models that were not listed on the sheet that needed to have this wire cut also).

On some bottom freezer models you may also have to cut a green wire.  Please follow the instructions included with the control board to see if your model requires this.

Re-install the back cover panel on the refrigerator, make sure the ground wire from the control board is grounded to one of the screws.

Plug in the refrigerator and test to make sure it is operating properly.

If you need to purchase a control board for you refrigerator please click the link below to visit our parts store.  We usually have the lowest price on the internet for these control boards.  If you have any questions or comments please post them in the comments section below.

GE Refrigerator Main Control Board – WR55X10942P

WR51X10101 – How To Wire and Install New Style Double Heater

Posted on July 15, 2011

GE’s WR51X10101 Defrost heater has been used for many years on many models of refrigerators.  GE used to use a single glass tube heater, and in 2007 they redesigned the defrost heater to a dual tube design that fits in the same location.  The new design spreads the wattage of the heater out over two glass tubes instead of one to reduce the number of heater failures.

*Before working on your refrigerator, make sure to unplug it.

What you’ll notice first on the new heater is that there is a yellow jumper wire on the left hand side.  Do not remove this jumper, hooking up the heater to only one of the heater tubes will cause it to burn out as soon as the refrigerator goes through a defrost cycle.  What you will need to do is remove the wire that used to go to the left side of the old heater (usually the blue wire) and run it over to the right side of the refrigerator. Both the blue and pink wire will be hooked up on the right side of the new heater.  See the above picture for reference.  In some cases, if the blue wire is not long enough to reach to the other side, it will need to be extended.  Included with the new heater is an extension wire and crimp connector to extend the wire.  The new heater should fit in the same place that the old heater went, it can be a tight fit but it will work.

If you need to purchase a defrost heater for your GE or Hotpoint refrigerator, see the link below.  If you have any questions, please post them in the comments below.

GE Defrost Heater Assembly – WR51X10101

GE Washer Won’t Agitate – Air Bell Coupler

Posted on June 28, 2011

Some GE built washing machines use a piece called a air bell coupling to connect the agitator to the transmission.  To access this part you need to remove the agitator, to do this you need to grab the base of the agitator and firmly pull up on it.  There are no bolts/nuts holding it down.  Once the agitator has been removed you will see the air bell coupler, there is a single bolt on the top of it to remove it.  With the air bell coupling removed take a close look at the splines on the inside of it, the splines should go ALL the way through.  If any of it is stripped out, then it needs to be replaced.

Notice in the picture above that the splines only go for about 1/8″ before it strips out.  Past that it is all rounded out on the inside.  That is what will cause the agitator not to move.

Parts Dr

Our customers matter a lot to us! So we provide YOU with as much information on repairing your appliance as possible. And its all FREE!

Categories

Locate Model Number

Choose your appliance type