Shipping Options

View more details in our Shipping Policy

All shipping rate advertisements assume delivery to continental US address, and that the part is in stock and is not oversized.

Shipping rates are per order, not per part!

Standard – $10.99
Estimated arrival
Thursday Apr 18–23
Quicker – $24.99
Estimated arrival
Thursday Apr 18
Quickest – $33.99
Estimated arrival
Wednesday Apr 17

Tag Archives: Dishwasher

GE Dishwasher not drying Dishes – No Error Code

There are no error codes thrown. Your dishwasher runs fine, through an entire cycle, but when you open the completed load of dishes, you find that the dishes that you just got done cleaning are completely soaked. Water is sitting on top of the glasses and in all of the areas that will hold water in your dishwasher load. You might immediately think, “The heating element has gone bad!” or “I need a new control board.” You may have a bad heating element or you may have a bad control board. However, the heating element or control board is rarely the issue for these symptoms.

There may be a simple answer to your non-drying GE dishwasher.

Your Float Switch Assembly may have failed.

First, search using your dishwasher’s model number at our website and pull up the parts list to see if your model has a float switch similar to the one in the above photo. If it does, you can order that after confirming fitment. Once you have received the part, the repair is fairly simple!

Overview of how to replace the float switch

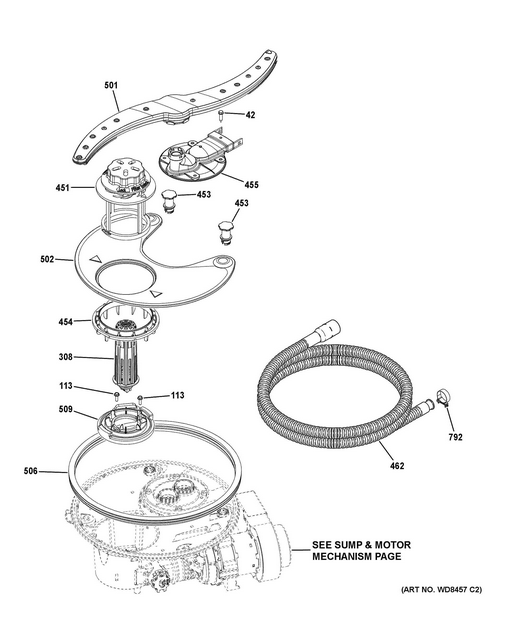
Step 1: You’ll want to pull your Filter (#451 in the diagram) from the bottom of the dishwasher to expose the Float switch assembly #308. There is a screw off ring (#454) that you can unscrew to best access the float switch. Once you have these removed, you can find the two screws that hold the float switch in place.

Note: You may need to dry the area around the float switch assembly as there may be standing water. If you remove your float switch and there is standing water it will leak out of the bottom of the dishwasher. You can use a wet/dry vacuum to remove the standing water.

Step 2: Remove the two 1/4″ screws holding the float switch down (This may be a different size on different models). Be careful not to lose the screws into the drain area holes next to the float switch assembly.

Step 3: Once the screws are removed, pull the Float Switch out of the hole. It is attached through the bottom to a wire harness plug. You can remove the electrical plug from the back of the float switch and plug your new float switch in.

Step 4: Place the float switch back in the hole and reinstall the two screws, hand tightening them. Reinstall the upper adapter #454 and the filter #451.

You should now have a dishwasher that completes a cycle and produces dry dishes for you to put away!

Where to Purchase

You can place your order for this float switch on our website (Parts Dr.) when ready! Please make sure to use our model number fitment checker prior to purchase!

Dishwasher Not Filling With Enough Water

Posted on July 12, 2011

Most dishwashers use a water inlet valve with a electronic solenoid to allow the dishwasher to fill up with water.  The dishwasher will use either a Timer or Control board to tell the dishwasher when to fill up with water and for how long to fill up with water.  Most dishwashers do not measure how much water is filling up into the dishwasher, instead they fill up with water for a certain amount of time.  60-120 seconds is a common amount of time for a dishwasher to fill up with water, but it will vary depending on the make and model of the dishwasher.

it might only fill up with 50% or 75% of the water it was supposed to

On the inlet side of the water valve there is a screen.  The purpose of this screen is to keep
sediment out of the insides of the valve.  If any small objects get into the valve it can cause it not to work or to leak and flood your house/floor.  Over time the inlet screen on the valve will get hard water deposits and other debri stuck in the screen which clogs up water valve and causes it not to flow as well.  So now when the dishwasher calls to fill up with water for XX seconds, it might only fill up with 50% or 75% of the water it was supposed to.  Symptoms of a clogged water valve can be poor washing, surging sound from the pump, and soap not washing out of the dispenser.

When this happens I always recommend replacing the water valve.  I have seen many people try to “clean” out the screens, and by doing this the valve developed a leak and cause thousands of dollars in damage to their house.  Most water valves are pretty inexpensive ($15-$75), so I recommend to just replace the valve if you see that the screen is clogged up.

To check to see if your valve has a clogged screen, pull it off the dishwasher and look inside the inlet side of the valve.

Here is an example of a clogged screen on a water valve:

Here is a good clean screen on a water valve:

Whirlpool Appliance Age – Serial Number Decoder

Posted on July 2, 2011

In order to find the age of a Whirlpool built appliance you will need the serial number from the appliance.  Since Whirlpool manufactures appliances under many different names, this may work with some of these brand names also:

Whirlpool, Kenmore (Sears), Maytag (Newer models), Kitchen Aid, Estate, Inglis, Roper, Amana, Jenn Air, Crosley and more.

Please do not contact our company for assistance trying to determine the age of your appliance as we will be unable to help.  If the information on this page does not answer your question please contact the manufacture directly for futher assistance.

Serial Number Example:

CR3949348

1st Digit: Where the appliance was manufactured. C = Clyde, OH.

2nd Digit: Year Manufactured.  R = 2004

3rd & 4th Digit: Week the appliance was manufactured.  39 = 39th week of the year.

5th-9th Digit: Manufacture order that week

See the charts below for the year codes:

Whirlpool Model Number Codes
A letter in the model number indicates the year the model was introduced. Please note that the year the model was introduced to NOT indicate the production date. For models 1981 and older you will reference the 2nd character in the model number, and on models produced after 1981 you will reference the 8th character in the model number. Please reference the charts below for the year codes:

Parts Dr

Our customers matter a lot to us! So we provide YOU with as much information on repairing your appliance as possible. And its all FREE!

Categories

Locate Model Number

Choose your appliance type