Shipping Options

View more details in our Shipping Policy

All shipping rate advertisements assume delivery to continental US address, and that the part is in stock and is not oversized.

Shipping rates are per order, not per part!

Standard – $10.99
Estimated arrival
Wednesday Apr 24–29
Quicker – $24.99
Estimated arrival
Wednesday Apr 24
Quickest – $33.99
Estimated arrival
Tuesday Apr 23

Category Archives: Washer

How To Replace 34001320 Neptune Drain Pump

Posted on July 14, 2014

Replacing the 34001320 drain pump on your Maytag Neptune washer is easy to do. This pump is found on many newer Maytag Neptune washing machines. When this pump goes bad or jams up (something gets stuck in the impeller), the washer will display an “ND” (No Drain) error code. Here is on how replace the drain pump:

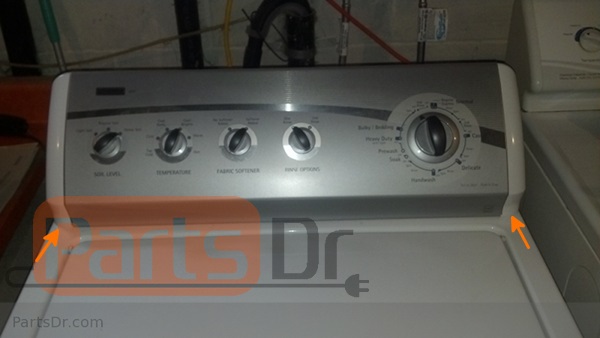
The drain pump is located in the back of the washer.

First unplug the washer.

Then remove the two screws holding on the back panel.

MAH6700AWWpump

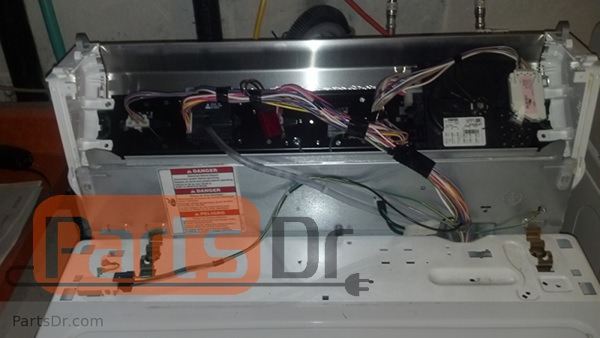
Slide the panel up, and then pull out to remove the panel.

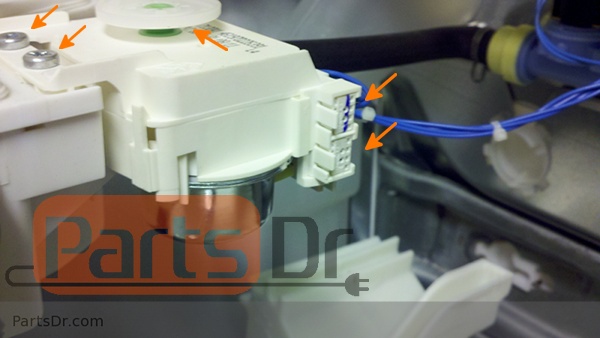
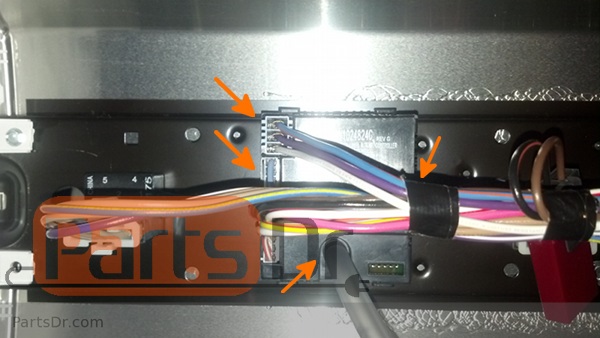
You should now see the pump on the left hand side. Remove the electrical connector (left red arrow).

Before removing the hose clamps, have a wet shop vac ready to suck up the water. I usually try to suck all of the water through the drain hose by putting the hose from the vacuum on the end of the drain hose and sealing the gap with my hand. If that doesn’t work then slowly remove one of the drain hoses and try to suck up all of the water before removing the hose all of the way.

Once all of the water is drained out then removed both hose clamps (middle and right red arrow). You’ll notice the clamps in the picture look different than the clamps that come with the washer. The clamps that come from the factory are weak and often leak, I would recommend upgrading these to worm gear style clamps while you have this apart.

Next remove the three 1/2 inch bolts holding the pump to the base of the washer (3 orange arrows).

With the pump removed look for anything stuck in the pump, and look to see that the three blades on the impeller look good. If the pump is bad, replace the pump.

34001320replacement

Reassemble in the reverse order.

If you have a bad drain pump and need to purchase a new one, please click the link below:

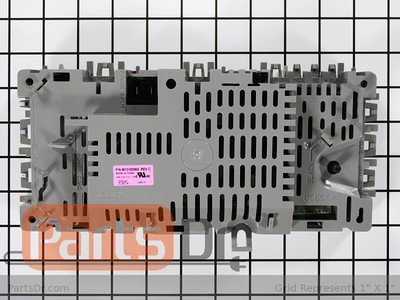
Drain Pump Assembly – 34001320

If part number 34001320 is not available, you can use part number DC96-00774A in its place.

Drain Pump Assembly – DC96-00774A

Whirlpool Duet Washer F30 Error Code

Posted on

Whirlpool Duet front loading washers use a motor on top of the dispenser assembly to switch the water in the dispenser between washing out the soap, bleach, and fabric softener compartments of the dispenser.  When the washer first starts, it tests to see if the dispenser is working correctly.  If it senses a problem, it won’t start the wash cycle and it will eventually come up with an F30 error code.  The F-30 error code means that there is a “dispenser system error”.

There are a few things that can cause the F30 error code to occur.  Here is what you will need to check:

  • First unplug the washer and remove the 3 mounting screws securing the top panel on the back side of the washer.  Slide the top panel backwards to remove.
  • Check the linkage going from the dispenser motor to the dispenser.  Make sure that the are no obstructions.
  • Check the wiring and electrical connections going from the dispenser motor and the main control board (CCU).
  • If the dispenser motor is turning but making clicking noises or continually turns, then the dispenser motor has probably failed and will need to be replaced.
  • If everything else checks out okay, then the central control unit (CCU) will need to be replaced.

Here is how to replace the W10352973 dispenser/detergent motor:

  • First unplug the washer before working on it
  • Now remove the top panel by removing the three T-20 torx screws and sliding the top panel towards the back of the washer to release it
  • Next remove the wire connectors to the dispenser motor.  Lift the locking tabs and pull them out to remove.  (Note:  when re-installing, the connector with the blue stripe on it goes on the top)
  • Remove the cam actuator from the motor shaft by gently prying up on it to unsnap it from the motor shaft.
  • Remove the mounting screw(s)
  • Re-install in the reverse order

W10352973

If you have a bad detergent dispenser motor and need to order a new one for your washer, please click the link below.  Please note the part number listed below is the common dispenser motor found on Whirlpool Duet models, the smaller Duet Sport models commonly use part number W10143586.  Please search by your model number or contact us with your model number so we can verify you are ordering the correct part number.

How To Install W10248240 Load Sensing Switch

Posted on

Some newer top load washing machines built by Whirlpool (also found under the Maytag and Kenmore brand names) use a load sensing switch to control the water level inside the washer.  On older washers this part was called a pressure switch.  This sensor switch is located in the top console of the washer, and is usually labeled as the water temperature control (A.T.C. control).  This switch senses the load inside the washer, and automatically adjusts the water level in the tub to the proper level.

Common symptoms that this part has when it fails are: filling with water at the very end of the cycle and agitating while filling with water.  Whirlpool has not released information on how to test this part out, so you will have to narrow down your problem with a process of elimination.  Other parts that can cause similar symptoms to a bad load sense switch are a bad timer, water inlet valve, and a clogged or kinked pressure hose (blowing through this is a good way to make sure it is clear).

If you are having repeated failures of this part, please check to make sure that the drain hose of the washing machine is at least 42″ from the floor and that it is draining into an open stand pipe or laundry tub.  If the drain hose is too low or the pipe/tub that the washing is draining into is not draining at a quick enough rate it can cause the water in the washer to be siphoned out which can damage the sensor switch and cause it to fail.

Here is how to replace the W10248240 Load Sensing Switch
First unplug the washing machine before working on it.

The sensor switch is labeled as the water temperature switch.  Remove this knob.
W10248240_Install1

Next, you will need to access the top console.  This is done by using a putty knife to depress the two clips on the left & right hand sides.  Some models may use two Phillips screws on the back side of the washer to secure the console.  The console will then rotate back and out of the way.
W10248240_Install2

Here is the console flipped out of the way
W10248240_Install3

With the console flipped back and out of the way you will now have access to the sensor switch.  Remove the pressure hose and the two wire connectors going to the switch.  Then to remove the switch from the console you will need to lift up on the tab on the right hand side, and then rotate the switch 1/4 turn counter-clockwise to remove.

W10248240_Install4

Re-install in the new part in the reverse order.

If you have a bad sensor switch and need to purchase a new one, please click one of the links below.  There are two different sensor switches and you can either check to see if your model number is listed below or you can get the part number from the back of the old part to make sure you are ordering the correct part number.

Temperature Sensor Switch – W10248240
Compatible model numbers: 110.29822801, 110.29832801, 1CWTW57ESVW1, MVWC5ESXW0, MVWC6ESWW1, MVWC7ESWW0, WTW57ESVH1, WTW57ESVW1, WTW58ESVW1

Pressure Sensor Switch – W10292584
Compatible model numbers: 110.29822800, 110.29832800, 1CWTW57ESVW0, MVWC6ESWW0, WTW57ESVH0, WTW57ESVW0, WTW58ESVW0

How To Remove & Install 131763202 Door Lock Latch

The Frigidaire door lock/latch 131763202 has been used on many different models of washers over the years.  Removing and installing this part is an easy that only takes a few minutes. No need to call Keys 4 The City locksmiths or a repair service, you can handle this one. These are some of the symptoms you can experience when the door latch/lock fails:  door won’t lock, door won’t unlock, E47 error code, agitates but won’t spin, and more.

Here is how to replace the door lock/latch assembly:

Always unplug your appliance before working on it.  First open the door and remove the two phillips screws.

Next remove the door boot seal clamp and peal back the door boot to give you access to the door lock.  You should be able to pull the door lock out and remove the three wire connectors that plug into the door latch.

Re-install the parts in the reverse order and test out the washer to make sure that it is operating correctly.

If you have a bad door lock/latch and need to purchase a new one, click the link below:

Door Lock Latch/Switch Assembly – 131763202

How To Remove & Install Drain Pump W10536347

Removing drain pump part number W10536347 is a simple task.  When this pump fails, the washer will display “LD” on the display which means “Long Drain”.  This pump can be found on Whirlpool Cabrio, Maytag Bravos, and Kenmore Oasis model washing machines.  The pump can fail if something gets stuck in the pump (coin, clothing item, ect), and sometimes you can get lucky and just remove the object that was stuck in the pump.  Other times the pump can break, so make sure so inspect the pump before putting it back in the washer.

How to the remove the drain pump:

  1. Unplug the washer
  2. Next, you will need to remove any water still in the washer (use a wetvac, bucket, towels, ect to do this)
  3. Turn off the water supply going to the washer & disconnect the hot & cold fill hoses to the washer
  4. Remove the drain hose from the wall or drain tub
  5. Tape the lid shut (so the lid doesn’t pop open)
  6. Carefully lay the washer down on its front side (place some towels or rugs on the floor to protect the washer).
  7. Note:  On the bottom side of the washer, the drain pump is the larger of the two pumps (the recirculation pump is the smaller one).
  8. Remove the drain hose (discharge hose) from the pump.  Loose then clamp and pull off the hose.  Note there is a notch in the hose to line up when you put the hose back on.
  9. Remove the inlet hose to the pump.  Loosen the clamp and remove the hose from the pump.
  10. Open the end cover on the pump and remove the wire connector.
  11. Remove the three 5/16″ screws securing the pump.
  12. The pump should now be free.  Check to see if anything is caught in the impeller.  If you notice any damage, or the pump still does not work then you will need to replace the drain pump assembly.
  13. Re-install in the reverse order.  NOTE:  The new pump includes a shield cover that goes between the pump and tub of the washer to protect the pump from any moisture falling onto it.

If you have any questions please post them in the comments section below.

If you need to purchase a new drain pump for your washer, visit our store by clicking the link below:

Drain Pump and Motor – W10536347

How To Install & Remove W10189966 Control Board

Removing and installing the W10189966 motor/machine control board in your washer is an easy task.  This control board is used on some Whirlpool Cabrio, Kenmore Oasis, and Maytag Bravos model washers.  When this control board fails, they will commonly come up with an F1 error code repeatedly that won’t go away.

  • First unplug the washer
  • Next, remove the three hex screws from the rear of the top console.
  • Then Lift the console off the cabinet and disconnect the cable going to the user interface board.  This will give you access to the motor/machine control board.
  • Disconnect the nine wire connectors going to the control board and the pressure switch hose (also called a pressure transducer tube).
  • Remove the mounting screw and lift the front of the control, slide it out from under the clips at the back, and remove it.
  • Re-install the new control board in the reverse order.

If you have any questions, please post them in the comments section below.

Visit our store if you need to purchase a new control board for your washing machine by clicking the link below:

Machine/Motor Control – W10189966

LG Washer Hall Senor Location

Posted on July 17, 2011

LG Hall Sensor 6501KW2002A Location

The hall sensor (6501KW2002A) on the LG front load washing machines is located on the bottom back side of the stator.  Unplug the washer, then to access it you have to remove the back panel of the washer, remove the rotor (single large bolt), then remove the stator (6 smaller bolts), unplug the two connectors and remove the ground and you can pull the stator off to access the hall sensor.  The hall sensor just clips on, so you just have to unclip the old one and clip on the new one.

The Hall Sensor is a Rotor Position Sensor (RPS), it tells the computer what position the rotor is in.  The computer uses this to see how fast the drum is spinning along with other things.  When the Hall Sensor goes bad, it will commonly give an LE error (Locked Rotor error) on the washer.  When the sensor goes bad it can cause the drum not to drum properly and even make the washer make some strange growling noises.

If you have any questions, post them in the comments below.  If you need to purchase a Hall Sensor for your LG washer, visit the link below.

Hall Sensor – 6501KW2002A

Whirlpool Appliance Age – Serial Number Decoder

Posted on July 2, 2011

In order to find the age of a Whirlpool built appliance you will need the serial number from the appliance.  Since Whirlpool manufactures appliances under many different names, this may work with some of these brand names also:

Whirlpool, Kenmore (Sears), Maytag (Newer models), Kitchen Aid, Estate, Inglis, Roper, Amana, Jenn Air, Crosley and more.

Please do not contact our company for assistance trying to determine the age of your appliance as we will be unable to help.  If the information on this page does not answer your question please contact the manufacture directly for futher assistance.

Serial Number Example:

CR3949348

1st Digit: Where the appliance was manufactured. C = Clyde, OH.

2nd Digit: Year Manufactured.  R = 2004

3rd & 4th Digit: Week the appliance was manufactured.  39 = 39th week of the year.

5th-9th Digit: Manufacture order that week

See the charts below for the year codes:

Whirlpool Model Number Codes
A letter in the model number indicates the year the model was introduced. Please note that the year the model was introduced to NOT indicate the production date. For models 1981 and older you will reference the 2nd character in the model number, and on models produced after 1981 you will reference the 8th character in the model number. Please reference the charts below for the year codes:

GE Washer Won’t Agitate – Air Bell Coupler

Posted on June 28, 2011

Some GE built washing machines use a piece called a air bell coupling to connect the agitator to the transmission.  To access this part you need to remove the agitator, to do this you need to grab the base of the agitator and firmly pull up on it.  There are no bolts/nuts holding it down.  Once the agitator has been removed you will see the air bell coupler, there is a single bolt on the top of it to remove it.  With the air bell coupling removed take a close look at the splines on the inside of it, the splines should go ALL the way through.  If any of it is stripped out, then it needs to be replaced.

Notice in the picture above that the splines only go for about 1/8″ before it strips out.  Past that it is all rounded out on the inside.  That is what will cause the agitator not to move.

Whirlpool Washer Doesn’t Spin Out Well

Posted on June 25, 2011

On Whirlpool built direct drive top load washing machines (also built under the Kenmore, Estate, Roper, Inglis, Kitchen Aid, Maytag, and Amana brand names) the motor is directly connected to the transmission and no belt is used.  When people complain that the washer doesn’t seem to spin out the clothes as well as it used to, it is commonly the transmission leaking grease that causes this problem.  What happens is the seal on the top of the transmission goes bad and leaks grease onto the clutch.  Once the grease gets onto the clutch, the clutch doesn’t have enough friction to spin the tub.  Lighter loads will usually spin out better than bigger heavier loads. Continue Reading – To Find Out If Your Washer Is Leaking Grease…

Parts Dr

Our customers matter a lot to us! So we provide YOU with as much information on repairing your appliance as possible. And its all FREE!

Categories

Locate Model Number

Choose your appliance type