Shipping Options

View more details in our Shipping Policy

All shipping rate advertisements assume delivery to continental US address, and that the part is in stock and is not oversized.

Shipping rates are per order, not per part!

Standard – $10.99
Estimated arrival
Thursday Mar 21–26
Quicker – $24.99
Estimated arrival
Thursday Mar 21
Quickest – $33.99
Estimated arrival
Wednesday Mar 20

Category Archives: Dryer

Fixing F4 E3 Dryer Error Code

Have the F4 E3 Error? Let’s get it fixed.

Introduction:

Is your dryer displaying the F4 E3 error code, leaving you puzzled and disrupting your laundry routine? No need to panic – this common issue with dryers can often be addressed without the need for professional assistance. In this guide, we will walk you through the steps to diagnose and fix the F4 E3 error code, ensuring your dryer gets back to optimal performance.

Understanding the F4 E3 Error Code:

Before we jump into solutions, it’s crucial to understand the meaning behind the F4 E3 error code. In most dryers made by Whirlpool, including Maytag, Amana, Kenmore and more, this code typically points to an airflow restriction issue. This restriction can lead to overheating and potential damage to your dryer.

Diagnosing the Problem:

To troubleshoot the F4 E3 error code, follow these systematic steps:

  1. Check Home Exhaust Vent: Ensure your home’s ventilation system is free from obstructions. Lint buildup, debris, or even bird nests in the vent can cause airflow restrictions.
  2. Inspect Vent Hose: Examine the vent hose that connects the dryer’s exhaust vent to the home for any kinks or blockages. A smooth, unrestricted path is crucial for proper airflow.
  3. Clean Lint Filter: Regularly clean the lint filter, as a clogged filter can impede airflow and trigger the error code.

Fixing the F4 E3 Error Code:

Once you’ve identified the airflow restriction as the likely issue, follow these steps to resolve the F4 E3 error code:

  1. Safety First: Unplug the dryer from the power source to ensure safety during the repair process.
  2. Vent Cleaning: Thoroughly clean the entire ventilation system, from the lint filter to the exterior vent. Use a vent cleaning kit or a vacuum with an extended attachment. If you have a long or hard to clean vent, look into hiring a professional to clean it.
  3. Inspect Vent Hose: Check the vent hose that goes between the dryer and the house exhaust vent for any damage or blockages. Replace if necessary.
  4. Lint Filter Replacement: If the lint filter is damaged or excessively clogged, consider replacing it with a new one.
  5. Reassemble and Test: Once the cleaning and replacements are complete, reassemble the dryer, plug it in, and run a test cycle to ensure the F4 E3 error code is resolved.
  6. Dryer not Working: If your dryer no longer works or starts, you may need to replace the thermal fuse, as it may have blown when the dryer was too hot trying to move air through the constricted airways. You can learn how to test your dryer’s thermal fuse here. To find and purchase the correct thermal fuse for your model, use the search box at the top of this page and enter your dryer’s model number to find the correct thermal fuse.

Conclusion:

Don’t let the F4 E3 dryer error code disrupt your laundry routine. By diagnosing the issue and following these steps to address airflow restrictions, you can save time and money on service calls.

We hope this guide has helped you tackle the F4 E3 error code in your dryer. If you have any questions or need further clarification, feel free to ask in the comments section. Don’t forget to search our site for all of your appliance parts that may be needed! Happy drying!

Ohm’s Law Calculator: A Crucial Tool for Appliance Repair

Ohm’s Law Calculator: A Crucial Tool for Appliance Repair

Ohm’s Law Calculator


Using the Ohm’s Law Calculator

To use the Ohm’s Law Calculator, follow these simple steps:

  1. Enter known values into any two input fields (Voltage, Current, Resistance, or Power).
  2. Optionally, you can select different units from the dropdown menus for each input field.
  3. Click the “Calculate” button to compute the remaining values.
  4. The calculator will automatically calculate and display the missing values based on Ohm’s Law.

For example, if you know the Voltage (V) and Current (I) in a circuit, enter those values into their respective fields, then click “Calculate” to find the Resistance (R) and Power (P). Similarly, you can enter any other combination of two known values to find the remaining two values.

Understanding Ohm’s Law: A Crucial Tool for DIY Appliance Repair

When it comes to DIY appliance repair, having a solid understanding of the fundamentals of electricity is essential. Among these fundamentals, one principle stands out as particularly crucial: Ohm’s Law. Named after the German physicist Georg Simon Ohm, this law forms the backbone of electrical engineering and is indispensable for troubleshooting and repairing a wide range of household appliances, including ranges, ovens, dishwashers, refrigerators, microwaves, washers, and dryers.

What is Ohm’s Law?

At its core, Ohm’s Law describes the relationship between voltage (V), current (I), and resistance (R) in an electrical circuit. It is often summarized by the formula:

V = I × R

Where:

  • V represents voltage, measured in volts (V).
  • I represents current, measured in amperes (A).
  • R represents resistance, measured in ohms (Ω).

In simpler terms, Ohm’s Law tells us that the voltage across a resistor in an electrical circuit is directly proportional to the current flowing through it, and inversely proportional to the resistance of the resistor.

Application in DIY Appliance Repair

Understanding Ohm’s Law can be incredibly beneficial when troubleshooting and repairing household appliances. Here’s how it applies to various scenarios:

  • Heating Elements in Ranges and Ovens: Heating elements in electric ranges and ovens are essentially resistors that generate heat when current flows through them. By applying Ohm’s Law, you can measure the resistance of a heating element (with the power disconnected) and determine if it is faulty. A significant deviation from the expected resistance indicates a problem with the heating element.
  • Motor Troubleshooting in Dishwashers, Washers, and Dryers: Motors in appliances like dishwashers, washers, and dryers rely on the relationship between voltage, current, and resistance. By measuring these parameters, you can diagnose motor issues such as worn-out brushes, damaged windings, or faulty connections.
  • Compressor Diagnosis in Refrigerators: Refrigerators use compressors to maintain the desired temperature. Ohm’s Law can help diagnose compressor problems by assessing the resistance of the compressor windings. A deviation from the expected resistance values could indicate a compressor issue requiring repair or replacement.
  • Microwave Magnetron Testing: The magnetron in a microwave oven is responsible for generating microwave radiation. Testing the magnetron’s resistance can help determine its health. Ohm’s Law assists in analyzing the relationship between voltage, current, and resistance to identify potential faults.
  • Electrical Safety: Beyond troubleshooting, understanding Ohm’s Law is crucial for ensuring safety during appliance repair. By calculating the expected voltage, current, or resistance in a circuit, you can anticipate potential hazards and take appropriate precautions, such as wearing insulated gloves and disconnecting power sources.

Conclusion

In the realm of appliance repair, Ohm’s Law serves as a powerful tool for diagnosing problems and identifying faulty components. By mastering this fundamental principle, you equip yourself with the knowledge and skills needed to tackle a wide range of appliance issues confidently. Whether you’re dealing with a malfunctioning range, a washer that won’t run, or a refrigerator that won’t cool, Ohm’s Law provides a reliable framework for effective troubleshooting and repair.

Armed with the understanding of Ohm’s Law, both professionals and DIY enthusiasts can embark on appliance repair projects with greater confidence, efficiency, and safety.

How to Use the Serial Number on Your GE Appliance to Determine Its Age

If you’re wondering how old your GE appliance is, you can determine its age by using the serial number. Each GE appliance has a unique serial number that contains information about the appliance, including the month and year of manufacture.

In this post, we’ll walk you through how to decode your GE appliance’s serial number to determine its age. We’ll use the examples from Eric’s video to illustrate the process.

Step 1: Locate your appliance’s model tag

Before you can decode your appliance’s serial number, you’ll need to locate its model tag. The model tag is a small metal or plastic plate that is typically located on the appliance in a safe but easy to find location. If you’re having trouble locating the tag, you can use our model number locator for common tag locations.

Step 2: Determine the month of manufacture

The first character of the serial number indicates the month in which the appliance was manufactured. Use GE’s Appliance Manufacture Date Code Chart to determine the corresponding month. For example, if the first character of your appliance’s serial number is ‘D’, it was manufactured in February.

Step 3: Determine the year of manufacture

The second character of the serial number indicates the years during which the appliance may have been manufactured. Use GE’s Appliance Manufacture Date Code Chart to determine the possible years. For example, if the second character of your appliance’s serial number is ‘R’, it could have been manufactured in 2020, 2008, 1996, 1984, 1972, or 1958.

Step 4: Use the owner’s manual to narrow down the year

To narrow down which year your appliance was manufactured, you’ll need to reference the owner’s manual. Look for a date on the bottom of the first or last page. If you don’t have a physical copy of the manual, you can find a digital version on GE’s website using your appliance’s model number.

Match up the year from the owner’s manual to the closest year in the chart. For example, if the date listed in your owner’s manual is 11-22 and the second character of your appliance’s serial number is ‘R’, the closest year in the chart is 2020. This indicates that your appliance was manufactured in February of 2020.

Examples

Let’s run through a few examples using the information from Eric’s video.

Example 1: GE Microwave

Serial Number: D S

Month: February

Possible Years: 2021, 2009, 1997, 1985, 1973, or 1959

Date Listed in Owner’s Manual: 11-08

Closest Year in Chart: 2009

This indicates that this microwave was manufactured in February of 2009.

Example 2: GE Stove

Serial Number: H A

Month: May

Possible Years: 2013, 2001, 1989, 1977, 1944

Date Listed in Owner’s Manual: 01-09

Closest Year in Chart: 2013

This indicates that this stove was manufactured in May of 2013.

Example 3: Older GE Stove

Serial Number: A H

Month: January

Possible Years: 2017, 2005, 1993, 1981, 1951

Date Listed in Owner’s Manual: 03-93

This indicates that this stove was manufactured in January of 1993.

Conclusion

Decoding your GE appliance’s serial number is a simple process that can help you determine its age. By using GE’s Appliance Manufacture Date Code Chart and the information from your appliance’s model tag and owner’s manual, you can easily determine when your appliance was made.

GE Dryer Main Control Board Programming Instructions

GE part number WE04X23220 & WE04X25559 main control board MUST be programmed after installation for the part to work with the dryer. The main control board is two electronic boards connected together by a wire spline and mounted in a plastic housing. The front board is the User Interface (UI) board and the rear board is the Machine Control board.  When the main control board is replaced, the new board MUST be programmed with a model ID code. The model ID consists of the “User Interface Mode Type” and the “Heater Type”.  The User Interface Mode Type is a number currently between 0 and 3. The Heater Type will be either an “E” for electric or a “g” for gas. Follow the instructions below to program the board.  When the main control board has been replaced, it may sometimes power up with all of the LED’s blinking. If this is the case, follow only steps 5 through 10 below. Otherwise, follow all of the steps from the beginning.

Main Control Board Model ID Programming

1. Begin with the dryer in Idle Mode (all LED’s on display off).

2. Press the following key sequence to enter Service Mode: My Cycle –> Delay Dry –> My Cycle –> Delay Dry.

NOTE: The sequence must be done in order. If there are any other button presses or buttons are pressed out of order, the sequence must be started from the beginning.

3. Upon entering Service Mode, the control will be in t1.

4. Press the Start/Pause button when “t1” is displayed.

5. Simultaneously press and hold both the Temp & Level buttons for three seconds to prepare the control for selecting the model.

6. Press the Level button to increase or press the Temp button to decrease the Model Code number selection until the correct number is displayed, per the table on the right.

User Interface Mode Type Table
(See part instructions if model is not listed in table.)

Model Number User Interface Mode Type
GFMR295EF/GF 0
GFDS260EF/GF 1
GFDS265EF/GF 1
GFDR270EH/GH 1
GFDR275EH/GH 1
GHDS360EF/GF 2
GHDS365EF/GF 2
GFDR480EF/GF 3
GFDR485EF/GF 3

7. Press the Start/Pause button to temporarily save the UI Model Code.

8. Next, the Heater Type selection is displayed as “g” or Gas or “E” for Electric. Press the Temp or Level to alternate the 7-segment display between the two Heater Type selections.

9. Press and hold the Start/Pause button for three seconds to set the Heater Type. The board will then return to an idle state and will exit Service Mode. It could take up to 10 seconds for the dryer to respond after exiting Service Mode.

10. The dryer is now ready for use.

If you need to purchase a new control board you can purchase this part from our website using the link below.  Please make sure to check on our website to make sure the part is compatible with the model number from the dryer before ordering.

Mfg Part # WE04X23220 (Part # PD00038167) – Control Board Assembly

Compatible Models:
GFDR480EF0WW
GFDR480EF1WW
GFDR480GF0WW
GFDR480GF1WW
GFDR485EF0MC
GFDR485EF0RR
GFDR485EF1MC
GFDR485EF1RR
GFDR485GF0MC
GFDR485GF0RR
GFDR485GF1MC
GFDR485GF1RR
GFDS250EF0WW
GFDS250GF0WW
GFDS260EF0WW
GFDS260EF1WW
GFDS260EF2WW
GFDS260GF0WW
GFDS260GF1WW
GFDS260GF2WW
GFDS265EF0MC
GFDS265EF0RR
GFDS265EF1MC
GFDS265EF1RR
GFDS265GF0MC
GFDS265GF0RR
GFDS265GF1MC
GFDS265GF1RR
GHDS360EF0WW
GHDS360EF1WW
GHDS360GF0WW
GHDS360GF1WW
GHDS365EF0MC
GHDS365EF0RR
GHDS365EF1MC
GHDS365EF1RR
GHDS365GF0MC
GHDS365GF0RR
GHDS365GF1MC
GHDS365GF1RR
GFD48ESPK0DG
GFD48ESPK0RR
GFD48ESSK0WW
GFD48GSPK0DG
GFD48GSPK0RR
GFD48GSSK0WW
GFD49ERPK0DG
GFD49ERPK0RR
GFD49ERSK0WW
GFD49GRPK0DG
GFD49GRPK0RR
GFD49GRSK0WW
GFDR270EH0WW
GFDR270EH1WW
GFDR270GH0WW
GFDR270GH1WW
GFDR275EH0MC
GFDR275EH1MC
GFDR275GH0MC
GFDR275GH1MC

How to test Whirlpool Thermistor Part # WP8577274

Posted on July 21, 2017

Whirlpool thermistor part number WP8577274 is used on many Whirlpool model dryers including some Maytag , Amana, Kenmore, Crosley and Inglis model dryers. When this thermistor fails it can cause your dryer to stop running or not heat correctly and display a F-22, F-23, E1, or E2 error code. If you are receiving either any these error codes you should test the thermistor.

Click the link below to purchase this part from our online store:

Whirlpool OEM part number: WP8577274 (PD00002401)

Tools required:
Multimeter or Ohm meter

This thermistor replaces these parts numbers:
3390292, 3406294, 3976615, 772546, 8577274, 1181075, AP6013514, PS11746740, EAP11746740

Resistance Chart:

Thermistor Resistance Chart

Video Transcript:

Hi this is Ryan with Parts Dr, and today I am going to show you how to test the thermistor on your dryer to see if it is good or bad.  This thermistor is a temperature sensor that measures the exhaust air temperature inside the dryer for the control board so it can maintain the desired temperature inside the dryer.

When the thermistor fails it can cause the dryer to display a F-22, F-23, E1, or E2 error code.   The dryer can display one of these error codes if the thermistor is shorted or open.

To test your thermistor you will first need to unplug the dryer, disconnect the wires to the thermistor, and remove the thermistor from the dryer.  Using a multi meter you will need to do an ohm test to check the resistance of the thermistor.  It is important to note that you can NOT do a continuity test on a thermistor.  Thermistors have a high ohm value that won’t register on a continuity test on most multimeters.  If you have an auto ranging multimeter, then turn the meter to the ohm setting.  If you have a manual ranging multi meter you will need to set the meter to the 20K or 40K setting.

Place one of each of the meters probes on each of the thermistors wire terminals.  A good thermistor should have an ohm reading around 11K Ohms at room temperature.  If your ohm reading is far higher or lower than this then you should replace the thermistor.  The resistance value of the thermistor varies depending on the temperature of the dryer, here is a chart that shows the different resistance values at different temperatures.

If you find that you have a bad thermistor and you need to purchase a new one, you can purchase one from our online store by clicking the link in the description below.  Please subscribe to our youtube channel for more appliance repair videos, and if you found this video helpful please click the thumbs up button below.  You can also stay up to date by liking us on our Facebook page, and following us on Twitter.

Who Made My Sears Kenmore Appliance

Kenmore is a popular appliance brand sold by Sears.  Sears does not manufacture any of the appliances themselves, instead they source that out and have other manufacturers make their appliances for them.  You can easily decode the model number of the appliance to tell you who made your Kenmore appliance.

The first three digits in a Kenmore model can will tell you who manufactured the appliance for Sears.  For example model number 110.45862400, the first three digits are 110 so that would tell you that Whirlpool manufactured the appliance.  Some of the more common appliance manufacturers Sears uses is Whirlpool, Frigidaire, LG, and GE. If you are looking for parts for your Kenmore appliance your can search for the model number in the search box at the top of the page.

Prefix Manufacturer Prefix Manufacturer
103 Roper 629 Jenn Air
106 Whirlpool 647 Roper
110 Whirlpool 651 Speed Queen
119 Frigidaire 664 Whirlpool
143 SFS Corp. (Sanyo/Fisher) 665 Whirlpool
144 Trane 666 KitchenAid
155 Preway 683 Philco
174 Caloric 719 Tappan (Frigidaire)
175 In-Sink-Erator 721 Goldstar (LG Electronics)
198 Whirlpool 747 Litton
233 Broan 757 Marvel, Imperial
253 Gibson (Frigidaire) 789 Defience
274 RCA 790 WCI (Frigidaire)
278 Roper 791 Tappan (Frigidaire)
292 Lennox 795 LG ( Refrigerators )
335 Amana 796 LG (Laundry)
336 Electrolux 835 Roper
342 York 840 Friedrich
362 GE 850 Whirlpool (Chambers)
363 GE 867 Keeprite
401 Samsung 879 Rheem/Ruud
416 Carrier 911 Roper
417 Kelvinator (Frigidaire) 917 Roper (Whirlpool)
464 GE 925 Maycor (Maytag)
473 Hoover 934 Hitachi
484 Fedders, Whirlpool 960 Caloric
562 Toshiba 970 Frigidaire
564 Sanyo C106. Inglis
565 Sanyo C110. Inglis
566 Sanyo C362. Camco
568 Panisonic C363. Camco
575 Sharp C646. Admiral (Inglis)
580 Goldstar (LG Electronics) C675. Woods
586 Panisonic C880. Admiral (Inglis)
587 DM (Frigidaire) C933. Kelvinator (Before 1970)
596 Amana C938. Keeprite
622 Kelvinator (Frigidaire) C970. Kelvinator (1970+)
628 Kelvinator (Frigidaire) C978. Camco

How To Test Frigidaire Thermistor 134587700

Posted on July 14, 2014

Newer Frigidaire and Kenmore dryers use a thermistor sensor to control the temperature inside the dryer. A thermistor is a type of resistor that varies it’s resistance with the change in temperature. When the thermistor fails, it can cause the dryer to not heat at all, get too hot, or sometimes it will throw an E24, E25, or F02 error code (open or shorted thermistor) on some models.

Here is how to check/test the Frigidaire 134587700 thermistor:

  • Before working on your clothes dryer, make sure it is unplugged.
  • First remove the thermistor sensor from the dryer. The thermistor is located on the blower housing next to the blower wheel.
  • With the thermistor removed from the dryer, you will need to use an ohm meter or multi-meter to measure the resistance of the thermistor.
  • Place one of each of the probes from the meter on each terminal of thermistor. With the thermistor at room temperature, the thermistor should read approximately 50-53k ohms. If the thermistor is off by more than 10% then the sensor will need to be replaced.

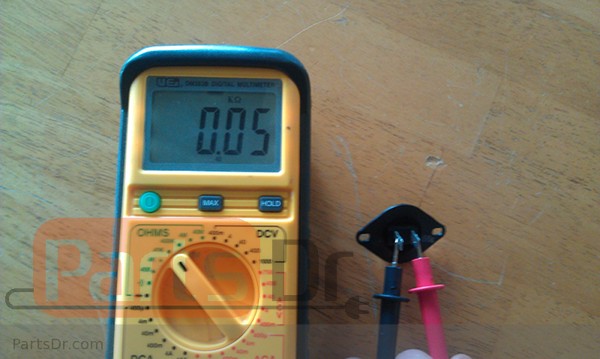
Here is a reading from a bad sensor (0.05k ohms):

134587700_bad

If you have a bad thermistor sensor and need to purchase a new one, please click the link below:

Dryer Thermistor Control – 134587700

How To Replace Whirlpool 279838 Heating Element

Posted on July 11, 2014

One of the most common repairs done to dryers is replacing the heating element.  This is an easy task that most any DIYer can tackle themselves.  The most common heating element found on Whirlpool dryers is part number 279838, this element is sometimes called the “shorty” because of its small size compared to its larger predecessor used on older Whirlpool dryers part number 4391960.

How To Replace The 279838 Heating Element

How To Test The 279838 Heating Element

My Dryer Still Doesn’t Heat After Replacing The Element

Where Can I Buy A Genuine Whirlpool 279838 Heating Element?

How to replace the 279838 heating element:

First before working on the dryer, you will need to unplug and remove the exhaust vent from the dryer.

Next, you will need to remove the back panel of the dryer. Remove the nine 1/4″ screws and then tilt the panel back and lift up to remove.

279838_Replacement1

Now remove the wires going to the heating element and high limit thermostat.  Some dryers may have up to five wires, so make sure to note the place and position of each wire.  The high limit thermostat is the part attached to the left side of the heating element.  Newer dryers will use a push on style high limit thermostat part number 3977767, and older dryers use a thermostat that is attached with one or two 1/4″ screws part number 3390291.

279838_Replacement3

Remove the two 1/4″ mountings screws on the left and right sides.

279838_Replacement4

With the two mounting screws removed, pull back on the bottom of the element, and then slide it down to remove it from the dryer.

279838_Replacement5

Remove the high limit thermostat from the old heating element and transfer it over to the new heating element.  You will have to pry up on it if you have a newer style thermostat, or you will have to remove the mounting screw(s) if you have an older style thermostat.

279838_Replacement6

Re-install everything in the reverse order. Make sure to check your dryer vent and blower housing (where the lint filter slides into) for any vent restrictions. This is the number one thing that causes heating elements to burn out prematurely.

My Dryer Still Doesn’t Heat

Multiple things on a dryer can cause dryers not to heat. The heating element is just one of many things that can cause your dryer not to heat. The second most common thing that causes these dryers not to heat is a bad thermal fuse. There are two thermal fuses, one is right next to the blower fan and one is on the heater box. The common blower thermal fuse is part number 3392519 and when that goes bad you should also replace the operating thermostat (Usually part number 3387134 or 694674). Whirlpool sells the high limit thermal fuse and thermostat on the heater box as a kit. Newer dryers use part number 279816 and older dryers use part number 279769. If you have a bad thermal fuse, then your dryer got too hot. Check your dryer and venting for any restrictions. Also make sure your heating element is not shorted to ground (this causes the heating element to stay on all the time).

Electric dryers also require 220-240 volts to work properly, if you only have 120v going to the dryer it is possible for it to run but not heat. The timer, motor, and bad wiring can also cause heating problems on dryers. All parts are specific to your model dryer, so please contact us before ordering parts.

How To Test The 279838 Heating Element

To test your heating element you will need to first remove the heating element from the dryer (follow the above instructions to remove the element). With the element removed from the dryer, do a visual inspection of the element. Often times you will be able to see a break in the heating coil. Sometimes it even helps to grab each section of the coil and wiggle it to make sure there isn’t a break in it. If you can’t see a break in the coil, then you will need an Ohm meter or Multi-Meter to test the heating element. Place one probe on each terminal of the heating element, you should get a reading of approximately 9-10 ohms on a good element. If you get no resistance, then the element is bad and will need to be replaced.

Where Can I Buy a Genuine Whirlpool 279838 Heating Element?

Parts Dr sells new genuine OEM Whirlpool replacement heating elements. You will often find knockoff heating elements sold for less money. These elements are lower quality, and don’t hold up as well in the long run. Visit the link below to visit our store to purchase a genuine Whirlpool 279838 heating element.

Whirlpool Dryer Heating Element  – 279838

279838

How To Install Samsung Dryer Heating Element DC97-14486A

Samsung dryer heating element DC97-14486A is used on many Samsung clothes dryers and even some Maytag (Neptune) and Amana dryer models.  When the heating element goes bad, it will usually have a break in the heating coil which will cause the element not to heat.  These instructions work for most Samsung dryers, some may have some small differences but the overall process if very similar.  Here is how to replace and test the DC97-14486A & DC47-00019A heating element:

First, unplug or shut off the power to the dryer before working on it.

How_to_remove_samsung_dryer_heating_element_DC47-00019A

Then remove the two screws securing the top panel to the back of the dryer.  Slide the top panel towards the back of the dryer to remove.  Now you will need to remove the front control panel, some model will have screws securing this. Remove them and then pull up to remove, you should have enough extra wire to set the control panel on top of the dryer to get it out of the way (if not, then disconnect the wires and set it off to the side).

Behind where the control panel was there will be four screws that secure the front panel of the dryer to the frame.  Remove these four screws.

How_to_remove_samsung_dryer_heating_element_DC47-00019A_2

Open the door of the dryer, there will be two screws that need to be removed at the bottom of the door frame area.  With those two screws removed you should be able to tilt the front panel forward, remove the connector to the door switch, and remove the front panel.

How_to_remove_samsung_dryer_heating_element_DC47-00019A_3

The heating element is located on the bottom right side of the dryer.  To remove the element you will need to remove the wires to the heating element, thermal fuse, and thermostat.  Then remove the mounting screw in the front and the whole heating element assembly should pull out the front of the dryer.

How_to_remove_samsung_dryer_heating_element_DC47-00019A_4

To test the heating element, you will need an Ohm meter or multi-meter.  A good heating element should read approximately 9-10 ohms.  A burned out element will have an infinite resistance (it won’t register anything).  See the video below for instructions on how to test the heating element.

To re-install the heating element you will need to put everything back in the reverse order.  If you lost track of how the wires connect to the heating element, please see the picture below.

DC97-14486A Wiring WM

If you need to purchase a new Samsung dryer heating element, click one of the two links below.

The best way to purchase the heating element is as an assembly. The heating element assembly includes the heating element, two thermostats, and housing.

Heating Element Assembly –  Part # PD00002003 (mfg # DC97-14486A)

We also sell the heating element by itself.  You will need to re-use the thermostats and element housing.

Heating Element – Part # PD00001991 (mfg # DC47-00019A)

Dryer Maintenance Tips

Maintaining your dryer properly can be the difference of saving yourself hundreds of dollars of repair costs over the lifetime of your dryer.  Not keeping your dryer lint free can not only cause your dryer to break down more, but the lint build up is a serious fire hazard.  Here are 4 things to check.

Lint Filter

Clean the lint filter for the dryer after every load.  If you see any tears or rips in the lint filter, replace the filter with a new one.  Any large holes in the lint screen will allow lint to get past the filter and prematurely clog up the inside of the dryer or the exhaust vent.

Blower Housing (Area Under Lint Filter)

The area underneath the lint filter is typically called the blower housing.  The blower housing is a main air duct where air flows through your dryer.  Often, lint will build up in this area and it will need to be cleaned out.  On some dryers you can use a small brush to stick into the lint filter opening to clean out the lint, and on other dryers the whole dryer has to be taken apart to clean out the blower housing.  This is important to keep clean to maintain good airflow in your dryer.

Dryer Vent

Over time,  and even when cleaning the lint screen every load, a small amount of lint still passes by the lint filter and some of it builds up inside your dryer exhaust vent.  This lint needs to be cleaned out either by taking the venting apart (if accessible), or by hiring a professional company to clean your vent out.  Always make sure to use metal venting.  Plastic flexible venting can cause fires, and should be replaced with new aluminum venting.

Dryer Cabinet

The inside cabinet of the dryer will build up with lint over time.  This usually doesn’t accumulate very fast, but if you have an exhaust vent that is not sealed up very well then a lot of that lint can circulate back into the dryer.  Before pulling your dryer apart, make sure to unplug it first.  Some dryers have a front bottom panel that is removable that will give you easy access to cleaning out the cabinet of the dryer.  Other dryer models have to be pull completely apart to accomplish this task.  If you aren’t very handy, you may need to hire a appliance repair man to do the job for you.

Parts Dr

Our customers matter a lot to us! So we provide YOU with as much information on repairing your appliance as possible. And its all FREE!

Categories

Locate Model Number

Choose your appliance type